Showing posts with label SQL Server Compact Edition. Show all posts

Wednesday, January 4, 2017

Downloading SQL Server Compact 3.5 SP2 for Devices

A number of developers are still, in 2017, developing new solutions for Windows CE / Windows Mobile using Visual Studio 2008 and SQL Server Compact 3.5 SP2. Unfortunately, Microsoft has removed the official download of the SQL CE 3.5 SP2 package for devices, which contains the cab files for installing the SQL CE runtime on various processor flavors of Windows CE / Windows Mobile and also contains a cab file for installing a System.Data.SqlClient (ADO.NET provider for SQL Server), that allows you to access SQL Server directly from a Windows Mobile device.

In this blog post I will describe the steps required to get the Device MSI installed on your development PC. Luckily, it is still currently possible to request the latest updates/hotfixes of the 3.5 SP2 runtime – I have a comprehensive list here.

We can take advantage of the fact, that each “patch” is essentailly a full release of all applicable packages, and that build 8109 is a full re-release of all possible packages.

1: Navigate to the KB page for hotfix 8109: https://support.microsoft.com/en-us/kb/2860310

2: Click the “Hotfix Download Available” link (blue button)

3: Accept the license agreemnt if prompted

4: Expand the list of hotfixes to show all 52 packages by clicking the link “Show hotfixes for all platforms and languages” (this text may be localized)

5: Select (put a checkmark next to) the file named: SSCEDeviceRuntime_ENU

6: Enter your email twice, and press the “Request hotfix” button (button text may be localized)

7: You will now receive an email with a link to the hotfix, download the linked file, named: 465553_ENU_ce_zip.exe

8: Double click the file, and extract it’s compressed contents:
SSCEDeviceRuntime-ENU.msi

9: Double click  SSCEDeviceRuntime-ENU.msi  to install the Devices SDK:

image

10: Complete the setup, the cab files are now present in the C:\Program Files (x86)\Microsoft SQL Server Compact Edition\v3.5\Devices folder

Monday, April 20, 2015

SQL Server Compact ADO.NET data access performance – part 1: Overview

In this five part series on SQL Server Compact performance, I will demonstrate and measure the performance of the two available data access APIs provider by the SQL Server Compact ADO.NET provider (System.Data.SqlServerCe.dll). The information in this blog post applies to both version 3.5 and 4.0. I will not cover usage of the unmanaged OLEDB interfaces (using C and C++)

As mentioned, the ADO.NET provider provides two APIs for data access (CRUD) operations:

One: The T-SQL standards based APIs - SqlCeCommand: ExecuteReader, ExecuteNonQuery, ExecuteScalar, that allows you to use text based SQL statements, including parameterized SQL. Most ORM implementations that support SQL Server Compact, like LINQ to SQL and Entity Framework, use this API, with the exception of the high perfromant OpenNETCF.ORM Framework, which is able to take advantage of

Two: The “table direct” APIs that allow you to bypass the T-SQL parsing and interpretation process, and that alone provides an obvious saving in processing. These include:

SqlCeResultSet (that inherits from SqlCeDataReader) - in particular when used with a SqlCeCommandType of TableDirect

SqlCeUpdateableRecord

SqlCeCommand.ExecuteResultSet

SqlCeDataReader.Seek

SqlCeCommand.SetRange

As you can see, none of these is available with the SQL Server ADO.NET objects, and they are particular to SQL Server Compact. This blog post series will demonstrate how to use these as alternatives to the “standard” methods.

The diagram from Laxmi’s blog post here explains the advantage graphically:

clip_image002

The “table direct” APIs bypass the Query Processor layer, and instead uses an ISAM like access pattern.

In the next blog post in this series, I will compare INSERT with SqlCeResultSet.Insert( SqlCeUpdateableRecord ) and demonstrate how to use the “Table Direct” APIs for INSERTs.

Monday, March 30, 2015

SQL Server Compact & SQLite Toolbox 4.2 – Visual Guide of new features

After more than 370.000 downloads, version 4.2 of my SQL Server Compact & SQLite Toolbox extension for Visual Studio 2010 and later is now available for download and available via Tools/Extensions and Updates in Visual Studio. This blog post is a visual guide to the new features, improvements and bug fixes included in this release, many suggested by users of the tool via the CodePlex issue tracker

The main features in this release have been improved integration with SQL Server & SQLite, and a number of improvements to the SQL editor.

This version is a recommended update for anyone using this tool.

Improved SQL Server integration

I have previously used this old tip from Jon Galloway for prompting users for a connection to a SQL Server/SQL LocalDB/SQL Azure database, but this caused a number of issues when connecting to LocalDB and SQL Azure, so for this release, you will use Server Explorer to create SQL Server connections, and then I will refer to these from the Toolbox.
So to interact with SQL Server from the Toolbox (for example for scripting, generating DGML files or Exporting a full database for SQL Server to SQLite, first connect to the SQL Server via Server Explorer:

clip_image002

Then launch the Toolbox (you can do that directly from Server Explorer), and select the relevant connection from Server Explorer from the dropdown list:

clip_image003

Export SQLite to SQL Server (and LocalDB/Express)

It is now possible to migrate a SQLite database to SQL Server without running creating any intermediate scripts. Simply right click your SQLite database in the Toolbox , and select the “Migrate to SQL Server” option:

clip_image004

Select your Server Explorer SQL Server connection (as described above), and you can follow the progress of the export via the Visual Studio status bar:

clip_image005

Many thanks to @thughesit for help with improving this feature.

As SQLite is much more loosely type than SQL Server, a new option have been added that will truncate string (causing data loss) if a string has been defined with a length like nvarchar(255) and the length of the data stored in SQLite actually exceeds this. This option is disabled by default. Any truncations will be logged to %temp%\SQLiteTruncates.log
clip_image006

You can now also migrate the other way, from SQL Server to SQLite, without any intermediate scripts. Right click the root “Data Connections” node of the Toolbox and select “Export SQL Server to SQLite (beta)”

clip_image007

Choose the Server from the dropdown list:

clip_image008

Choose the tables to Export:

clip_image010

And specify the name for the new SQLite database file, and you can follow the progress of the Export via the Visual Studio status bar.

SQL editor improvements

clip_image012

The query editor has received a number of highly requested improvements:

Improved document handling:
There is now both a “Open” (1) “Save” and “Save As” (2) buttons, and each editor window is aware of its underlying document. If there is a document open, it is indicated in the window caption, and a * symbol indicates if the document has unsaved changes:

clip_image013

Keyboard shortcuts: Keyboard shortcuts have been added for "Execute" query: F5, Save: Ctrl+S
and Open: Ctrl+O – a long standing request finally implemented
Export results as CSV: A new button has been added, that will export the first results as a csv (Excel) file, saving you having to copy and paste the results to Excel.

SQLite PRAGMAs: It is now possible to execute PRAGMA commands with SQLite

Other Improvements

Migrating a SQL Compact or SQLite database to SQL Server no longer blocks the UI.
Exporting a database from SQL Server no longer blocks the UI.
No more Error Reporting dialog, I am now using Exceptionless for error reporting instead.
Improved formatting of DataAcccess.cs sqlite-net code
Improved initial directory when adding SQLite and SQL Compact connections
Improved error information when SQLite datetime parsing errors occur (SQLite allows you to put anything in a column defined as datetime, apparently!)
Improved error information when SQL Server script execution errors occur (would mainly happen when exporting from SQLite to SQL Server)
Closing the Edit Data grid now closes the connection to the database, meaning that the Toolbox will have no open connection to the database file when all Edit Grids are closed.
Update to version 1.0.96 of SQLite ADO.NET provider

Bug fixes

Migrate to SQL Server feature was broken
Merge Replication Subscription creation was broken
Edit column should not show "Primary Key" column, and not allow editing of column name
Opening the SQL Editor sometimes crashed VS
FormatException in Explorer window

Monday, January 12, 2015

“SQL Server Compact & SQLite Toolbox” related news

This blog post contains three bits of news, that all relate to my SQL Server Compact / SQLite Toolbox Visual Studio add-in

Visual Studio 2013 Community Edition

Microsoft recently released Visual Studio 2013 Community, a free, full featured edition of Visual Studio, has essentially all features found in VS Professional, expect some Office/SharePoint project templates, and is free for many scenarios (please check the licensing requirements). Previously, users of the SQL Server Compact Toolbox with VS Express had to use the standalone edition of the Toolbox. If you replace your Express edition with Community, this is no longer the case, as it supports all VSIX extensions from the VS Gallery / Extensions and Updates dialog in Visual Studio. A very bold move from Microsoft, and a major  boost for open source/hobby developers. If you have any questions about this VS edition, start by reading the Q&A here

image

Visual Studio Auto Updater

Mads Kristensen, a Microsoft Program Manager (and fellow Dane), recently released the “one extension to rule them all”, the Visual Studio Auto Updater extension. It allows you to specify which of your Visual Studio extensions you want to automatically update when a new version is released. I have submitted a pull request to have the SQL Server Compact / SQLite Toolbox included in the list of extensions that are always updated. Highly recommended, ensures that you Visual Studio installation is always fresh.

image

SQLite Toolbox on the Channel 9 “Visual Studio Toolbox” show

In early November last year I had the opportunity to appear on the popular Channel 9 show “Visual Studio Toolbox” hosted by Robert Green. In the show, I present the new SQLite support in the Toolbox. A good intro if you want to get started using the Toolbox.

VSToolbox2

Version 4.2 preview

The next release of the Toolbox, version 4.2, is currently available in preview from CodePlex. The main focus for this release is a number of (overdue) improvements to the SQL query editor:

Editor2

1: The editor now has proper “file” handling, with Save and Save As buttons, and the saved file name appearing in the tab caption.

2: Keyboard shortcuts have been enabled, allowing you to use F5 to execute queries, and use Ctrl+O to open scripts, and Ctrl+S to save scripts.

3: A button to export the current result as CSV (Excel) format has been added.

Try out the preview, and let me know if you have any suggestions or find any issues via the CodePlex issue tracker.

Monday, October 20, 2014

Entity Framework 6 and SQL Server Compact 4.0 – “Proper” private desktop deployment

About a year after I published the blog post Entity Framework 6 & SQL Server Compact 4 (2)–Easy Private Desktop Deployment it has occurred to me that the solution proposed in that blog post is far from perfect – my apologies! The suggestions for location of the database file etc. are still valid points, however.

TL;DR – Use my new NuGet package for Private Desktop deployment with SQL Server Compact 4.0 and Entity Framework 6, and make sure that:
- The binding redirect is set to: oldVersion="4.0.0.0-4.0.0.1"
- Prefer32Bit project option is disabled

The goal

First, let’s clarify what the goal behind “private desktop deployment” with SQL Server Compact is:

The goal is to be able to drop a folder of files on any PC and just run  a .NET application that includes a self-contained relational database and a sophisticated ORM over that database.

This goal is achievable with SQL Server Compact 4.0 and Entity Framework 6, as long as the PC in question has .NET Framework 4.0 installed.

The issues


First, let us look at the issues with the approach in the above blog post:
1: This approach uses the Microsoft.SqlServer.Compact package, which explicitly uses the non-private assembly version of System.Data.SqlServerCe.dll (which is 4.0.0.0). And it assumes that your project targets AnyCPU. This means that if you have SQL Server Compact installed in GAC, then the version from there will be picked up. That will work fine, as long as you have the exact same build of SQL Server Compact in both GAC and your application folder. But this leads us to issue number 2!
2: The EntityFramework.SqlServerCompact package does not depend explicitly on a release version of the Microsoft.SqlServer.Compact NuGet package and will pick up build 8854, which is 4.0 SP1 CTP1, instead of build 8876, which is 4.0 SP1 proper. (I wish that the 8854 builds were no longer visible on NuGet) – I am working on a fix for this, which is planned for EF 6.1.2. So the chances of not having the same version in GAC and locally are relatively big, and this will cause an error to be thrown, preventing your app from working:
Possible file version mismatch detected between ADO.NET Provider and native binaries of SQL Server Compact which could result in an incorrect functionality.


Manual fix

If you would like to ensure that your desktop application (console, Windows Forms or WPF) app can run anywhere use proper private deployment, follow these steps (in outline):

1: Install EntityFramework.SqlServerCompact

2: Copy files from Private folder in C:\Program Files (x86) to the project folder (as described in my Private deployment with LINQ to SQL blog post)

3: Make project x86 only (or at least remove the “Prefer 32 bit” option if you include all unmanaged dll files 

4: Disable post build event (via Project Properties/Build events tab) to prevent the 4.0.0.0 dll from being deployed

5: Modify app.config

a) add assembly redirect, as the EntityFramework.SqlServerCompact.dll references version 4.0.0.0, and we want to use 4.0.0.1:

<runtime>
<assemblyBinding xmlns="urn:schemas-microsoft-com:asm.v1">
<dependentAssembly>
<assemblyIdentity name="System.Data.SqlServerCe" publicKeyToken="89845dcd8080cc91" culture="neutral"/>
<bindingRedirect oldVersion="4.0.0.0-4.0.0.1" newVersion="4.0.0.1"/>
</dependentAssembly>
</assemblyBinding>
</runtime>

b) With version 4.0.0.0 => 4.0.0.1 in DbProviderFactories section:


“Automatic” fix

I have published a NuGet package EntityFramework.SqlServerCompact.PrivateDeployment  that performs most of the actions above, specifically 1, 2 (via a clever package that performs a build step), 3 (via an additional command in install.ps1), 4, and partly 5 (for some reason NuGet generates an incorrect bindingRedirect, so it must be fixed manually). Currently in pre-release, please provide feedback!

image

This package includes both the EntityFramework.SqlServerCompact provider for EF 6.1.1 and the SQL Server Compact 4.0 files for private deployment. I intend to update the package with the upcoming version 6.1.2 release of Entity Framework.

Thursday, September 25, 2014

Comparison of SQL Server Compact, SQLite, SQL Server Express and LocalDB

Now that SQL Server 2014 and SQL Server Compact 4 has been released, some developers are curious about the differences between SQL Server Compact 4.0 and SQL Server Express 2014 (including LocalDB)

I have updated the comparison table from the excellent discussion of the differences between Compact 3.5 and Express 2005 here to reflect the changes in the newer versions of each product.

Information about LocalDB comes from here and SQL Server 2014 Books Online. LocalDB is the full SQL Server Express engine, but invoked directly from the client provider. It is a replacement of the current “User Instance” feature in SQL Server Express.

Deployment/ Installation Features

SQL Server Compact 3.5 SP2

SQL Server Compact 4.0

SQLite, incl. ADO.NET Provider

SQL Server
Express 2014

SQL Server 2014 LocalDB

Installation size

2.5 MB download size
12 MB expanded on disk

2.5 MB download size
18 MB expanded on disk

10 MB download, 14 MB expanded on disk

120 MB download size
> 300 MB expanded on disk

32 MB download size
> 160 MB on disk

ClickOnce deployment

Yes

Yes

Yes

Yes

Yes

Privately installed, embedded, with the application

Yes

Yes

Yes

No

No

Non-admin installation option

Yes

Yes

Yes

No

No

Runs under ASP.NET

No

Yes

Yes

Yes

Yes

Runs on Windows Mobile / Windows Phone platform

Yes

No

Yes

No

No

Runs on WinRT (Phone/Store Apps) No No Yes No No
Runs on non-Microsoft platforms No No Yes No No

Installed centrally with an MSI

Yes

Yes

Yes

Yes

Yes

Runs in-process with application

Yes

Yes

Yes

No

No (as process started by app)

64-bit support

Yes

Yes

Yes

Yes

Yes

Runs as a service

No – In process with application

No - In process with application

No - In process with application

Yes

No – as launched process

Data file features

SQL Server Compact 3.5 SP2

SQL Server Compact 4.0

SQLite, incl. ADO.NET Provider

SQL Server
Express 2014

SQL Server 2014 LocalDB

File format

Single file

Single file

Single file

Multiple files

Multiple files

Data file storage on a network share

No

No

No

No

No

Support for different file extensions

Yes

Yes

Yes

No

No

Database size support

4 GB

4 GB

140 TB

10 GB

10 GB

XML storage

Yes – stored as ntext

Yes - stored as ntext

Yes, stored as text

Yes, native

Yes, native

Binary (BLOB) storage

Yes – stored as image

Yes - stored as image

Yes

Yes

Yes

FILESTREAM support

No

No

No

Yes

No

Code free, document safe, file format

Yes

Yes

Yes

No

No

Programmability

SQL Server Compact 3.5 SP2

SQL Server Compact 4.0

SQLite, incl. ADO.NET Provider

SQL Server
Express 2014

SQL Server 2014 LocalDB

Transact-SQL - Common Query Features

Yes

Yes

No

Yes

Yes

Procedural T-SQL - Select Case, If, features

No

No

Limited

Yes

Yes

Remote Data Access (RDA)

Yes

No (not supported)

No

No

No

ADO.NET Sync Framework

Yes

No (not supported)

No

Yes

Yes

LINQ to SQL

Yes

No (not supported)

No

Yes

Yes

ADO.NET Entity Framework 4.1

Yes (no Code First)

Yes

Yes

Yes

Yes

ADO.NET Entity Framework 6 Yes (fully) Yes (fully) Yes (limited) Yes Yes

Subscriber for merge replication

Yes

No

No

Yes

No

Simple transactions

Yes

Yes

Yes

Yes

Yes

Distributed transactions

No

No

No

Yes

Yes

Native XML, XQuery/XPath

No

No

No

Yes

Yes

Stored procedures, views, triggers

No

No

Views and triggers

Yes

Yes

Role-based security

No

No

No

Yes

Yes

Number of concurrent connections

256 (100)

256

Unlimited

Unlimited

Unlimited (but only local)

There is also a table here that allows you to determine which Transact-SQL commands, features, and data types are supported by SQL Server Compact 3.5 (which are the same a 4.0 with very few exceptions), compared with SQL Server 2005 and 2008.

Friday, January 10, 2014

SQL Server Compact Toolbox 3.7–Visual Guide of new features

After more than 235.000 downloads, version 3.7 of my SQL Server Compact Toolbox extension for Visual Studio 2013, 2012 and 2010 is now available for download (and available via Tools/Extensions in Visual Studio). This blog post is a visual guide to the new features included in this release, many suggested by users of the tool via the CodePlex issue tracker. A major “theme” for this release has been to improve the experience for Visual Studio 2013 users, which has no Server Explorer/DDEX support for SQL Server Compact at all.

Add Column, Index and Foreign Key to table

As Server Explorer support is completely missing in VS 2013, and only available for 4.0 in VS 2012, I have added dialogs for building script to add columns, indexes and foreign keys to a table. Right click any table, and select the desired dialog:

image

image

image

  image

Note that currently the Index and Foreign Key dialogs only support a single column, I am aware of this, so please vote here and/or here.

Generate Entity Framework 6 Entity Data Model with VS 2012 and SQL Compact 3.5

The code generation menu items have now been moved to a sub-menu:

image

In addition, as the Entity Framework Tools are now available for Visual Studio 2012 as well as Visual Studio 2013, it is now possible to generate a “database first” Entity Framework model (EDMX) based on a SQL Server Compact database in VS 2012. And I have just contributed an Entity Framework SQL Server Compact 3.5 provider (available as prerelease on NuGet), that allows you to use SQL Server Compact 3.5 with Entity Framework 6. 

Copy database file

It is now possible to copy a database file, and then for example paste it into your project, should you so desire, simply by pressing Ctrl+C on the selected database, or selecting the context menu item:

image

Data only export to SQL Server

The current data export feature has been enhanced to support SQL Server and IDENTITY columns by using DBCC CHECKINDENT instead of the unsupported ALTER TABLE statements currently used.

image

New "ALTER column" context menu item

To help you modify columns, a new context menu to script ALTER COLUMN statements has been added:

image

“Database designer”

I am now hosting a web based database designer based on http://code.google.com/p/wwwsqldesigner/ (which implements only the SQL Server Compact column data types). Current state is “alpha” (and there are known issues with IE 11)!

Server DGML now has table selection
When generating a database diagram for a SQL Server database, you can now select which tables to include in the graph, which can be helpful when diagramming databases with many tables. I have already blogged about this earlier.
Other improvements and bug fixes

Missing database files indicated in tree view
No longer depends on the SQL Server Compact 3.5 runtime, and no longer depends on DbProviderFactory, simply requires either 3.5 or 4.0 in GAC
Each Query opens in new window
BUG: "Upgrade to 4.0" was blocked in Visual Studio 2013
BUG: Not ideal support for Dark Theme in VS 2012/2013 (improved slightly)
BUG: EF6 EDMX code generation with VB was broken

Monday, December 2, 2013

The trouble with Any CPU–Prefer 32 bit–BadImageFormatException

In my previous 2 blog posts here and here, I have briefly mentioned the new default Target Platform for new .NET 4.5/4.5.1 projects in Visual Studio 2012/2013. To be perfectly honest, it was not exactly clear why this was an issue with the SQL Server Compact ADO.NET provider, so I decided to dig a little deeper.

To read more about the new default Platform target option introduced in .NET 4.5, see the MSDN documentation here, and the blog post here.

image

Why is this Target platform an issue for the SQL Server Compact provider?

Let’s find out how the provider detects if it is running on a x86 or x64 (AMD64) system. In .NET 4.0, two new properties were introduced, System.Environment.Is64BitProcess and System.Environment.Is64BitOperatingSystem (for a nice overview of their implementation see this blog post. But the provider code is old, and uses a different method: It looks at the PROCESSOR_ARCHITECTURE environment variable, and assumes that it reflects the value of the current process bitness (possible values are x86 and AMD64 on a Intel x64 system). In fact, it first looks in the .exe folder for a valid version of sqlceme40.dll, and if not found, then in a subfolder named after the processor architecture (ie x86 or AMD64).

In order to test how an app responds, I then made a small .NET 4.5 console app to test the values of the new Environment properties and the PROCESSOR_ARCHITECTURE value. I added the SQL Server Compact NuGet package (Microsoft.SqlServer.Compact) to test how the engine responds using Private Deployment under the four different Target Platform options. And I uninstalled the SQL Server Compact 4.0 runtime from Add/Remove Programs, so it is no longer in the GAC.

string path = @"c:\temp\test.sdf";
Console.WriteLine("Is64BitOS: " + System.Environment.Is64BitOperatingSystem);
Console.WriteLine("Is64BitProc: " + System.Environment.Is64BitProcess);
Console.WriteLine("PROCESSOR_ARCHITECTURE: " + System.Environment.GetEnvironmentVariable("PROCESSOR_ARCHITECTURE"));
Console.ReadKey();
if (System.IO.File.Exists(path))
System.IO.File.Delete(path);
using (SqlCeEngine engine = new SqlCeEngine(string.Format("Data Source={0}", path)))
{
engine.CreateDatabase();
}


1: Output with Any CPU, Prefer 32 bit:


Is64BitOS: True
Is64BitProc: False
PROCESSOR_ARCHITECTURE: AMD64


And getting error: Unable to load the native components of SQL Server Compact corresponding to the ADO.NET provider of version 8876.

As you can see even if it is a 32 bit process, the PROCESSOR_ARCHITECTURE variable has the “wrong” value, causing the SQL Server Compact ADO.NET provider System.Data.SqlServerCe.dll to try to load the dll files from the AMD64 folder in a 32 bit process.


2: Output with Any CPU, Prefer 32 bit unchecked:


Is64BitOS: True
Is64BitProc: True
PROCESSOR_ARCHITECTURE: AMD64


- and no errors


3: Output with x64:


Is64BitOS: True
Is64BitProc: True
PROCESSOR_ARCHITECTURE: AMD64


- and no errors


4: Output with x86:


Is64BitOS: True
Is64BitProc: False
PROCESSOR_ARCHITECTURE: x86


- and no errors


Hopefully this blog post will prevent some form getting bitten by this “issue”, which also affects the SQLite ADO.NET provider.

Monday, October 7, 2013

SQL Server Compact 4 desktop app with simple Private Deployment and LINQ to SQL

In this post I will describe a simplified approach to SQL Server Compact Private Deployment, for an overview blog post on Private Deployment with SQL Server Compact, see my blog post here.

By forcing your app to run using x86 always (Prefer 32-bit), which is the new default Platform target option  for apps targeting .NET Framework 4.5, deployment of SQL Server Compact with you app becomes simpler, but must follow different guidelines from what I have previously blogged about. (The same approach will also work with apps targeting .NET 4.0, just set the Platform target to x86 in the location shown below. And the same approach will also work with the SQL Server Compact 3.5 DLL files.)

image

To read more about the new default Platform target option introduced in .NET 4.5, see the MSDN documentation here, and the blog post here.

In addition, I will demonstrate how to use LINQ to SQL with SQL Server Compact 4.0, a low overhead, fast performing ORM.

For the sake of simplicity, and in order to focus attention on the private deployment aspects, I will demonstrate with a console application, but the same approach will also work for WinForms and WPF applications.

Before you get started, make sure you have the following installed:

1: Visual Studio 2010/2012/2013 Pro or higher 

2: SQL Server Compact Toolbox add-in (Install via Tools/Extensions in VS)

3: An existing SQL Server Compact database file, I will use Chinook, which you can download from here. 

4: The SQL Server Compact 4.0 SP1 runtime

(You could also use the free Visual Studio 2010/2012/2013 for Windows Desktop with the standalone SQL Server Compact Toolbox for 4.0, which also supports LINQ to SQL code generation)

With that in place, let us open Visual Studio and get started:

Create new console application

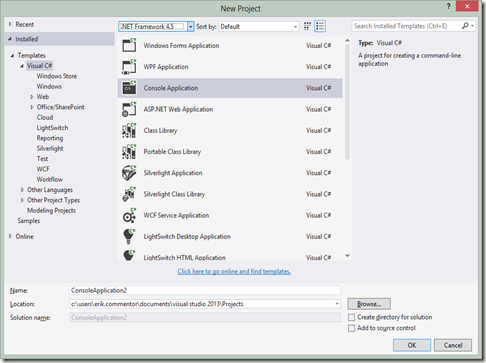
Go to File, New Project, and create a new Windows Console application. Make sure to set the target platform to 4.0 or newer.
image

Include the SQL Server Compact binaries in your project

Now include the SQL Server Compact 4.0 binaries and ADO.NET Provider as content in your app. Copy C:\Program Files (x86)\Microsoft SQL Server Compact Edition\v4.0\Private\System.Data.SqlServerCe.dll to your project folder, and then copy all files and folders in C:\Program Files (x86)\Microsoft SQL Server Compact Edition\v4.0\Private\x86 also to your project folder.

In the Solution Explorer, select Show All Files, and include the new folder and the seven files just copied in the Project:

image

Now mark all the copied files (also the files in the Microsoft.VC9.CRT folder) and mark them as Content, Copy Always:

image

Finally, add a Reference to the System.Data.SqlServerCe.dll file in your project folder:

image

(Make sure to check the file location and the Version, should be 4.0.0.1)

Add your database file to the project

Make sure it is also Content, Copy Always – we use the”Database First” workflow here.

Generate the LINQ to SQL DataContext

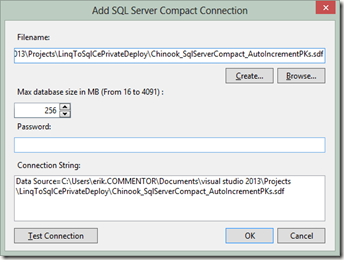
Next,we will generate a LINQ to SQL DataContext class and related Table classes based on the database, so connect to the database in SQL Server Compact Toolbox, using the Add SQL Server Compact 4.0 Connection menu item:
image

Then right click the database and select “Add LINQ to SQL DataContext to current project”:

image

(I am just using ChinookContext as Context name)

Click OK, and a DataContext class file will be added to your project, and the required reference to System.Data.Linq will be added to the project.

Now let us add some test code to the Main method in order to verify that everything works so far, so the Program.cs code looks like this:

using System;
using System.Data.SqlServerCe;

namespace LinqToSqlCePrivateDeploy
{
class Program
{
private const string
dbFileName = "Chinook_SqlServerCompact_AutoIncrementPKs.sdf";

private static string dbConnectionString =
string.Format("Data Source=|DataDirectory|{0};Max Database Size=4091", dbFileName);
static void Main(string[] args)
{
using (var connection =
new SqlCeConnection(dbConnectionString))
{
using (var context = new ChinookContext(connection))
{
//To log SQL statements, use:
//context.Log = Console.Out;
foreach (var album in context.Album)
{
Console.WriteLine(album.Artist.Name);
Console.WriteLine(album.Title);
}
}
}
Console.Read();
}
}
}


We can now access the database via the generated object model, and do not have to type SQL, but can use LINQ to query the database. In addition, we can update the database (INSERT, UPDATE, DELETE) via methods on the DataContext.

Notice that the DataContext must be constructed with a SqlCeConnection object, in order for LINQ to SQL to work with SQL Server Compact 4.0.

Deploy the database file

The final step will be done to ensure that the database file will be located in a writeable location on the users machine when deployed/installed. We will simply do this in code in order to not depend on any install actions and issues. In addition, we can do this without storing any connection strings in app.config, making the app more self-contained. We will use the same approach that I have already used in my blog post here, which takes advantage of the DataDirectory connection string macro.

private static void CreateIfNotExists(string fileName)
{
string path = Environment.GetFolderPath(Environment.SpecialFolder.ApplicationData);
// Set the data directory to the users %AppData% folder
// So the database file will be placed in: C:\\Users\\<Username>\\AppData\\Roaming\\
AppDomain.CurrentDomain.SetData("DataDirectory", path);

// Enure that the database file is present
if (!System.IO.File.Exists(System.IO.Path.Combine(path, fileName)))
{
//Get path to our .exe, which also has a copy of the database file
var exePath = System.IO.Path.GetDirectoryName(
new Uri(System.Reflection.Assembly.GetExecutingAssembly().CodeBase).LocalPath);
//Copy the file from the .exe location to the %AppData% folder
System.IO.File.Copy(
System.IO.Path.Combine(exePath, fileName),
System.IO.Path.Combine(path, fileName));
}
}


Remember to add a call to CreateIfNotExists as the first line in the Main method:

static void Main(string[] args)
{
CreateIfNotExists(dbFileName);


You can now use ClickOnce, XCopy or an Installer to deploy your app, with no other requirements than the target .NET Framework version.


What we have achieved:


- Simple, self contained deployment of a single user desktop app of any type to any .NET 4.0 or higher platform (not ARM, though)


- No need for special incantations in app.config


- RAD (Rapid App Development) “Database First” access to a well-performing, well-documented and simple ORM.


You can download the complete solution from here; http://sdrv.ms/179QBaa

Monday, June 3, 2013

INSERTing many rows with Entity Framework 6 beta 1 and SQL Server Compact

In this blog post I will demonstrate a couple of improvements for adding many entities to a Entity Framework based database. You can read more about the beta 1 release here, and Julie Lerman highlights some of the features that were available in the alpha here. For all full list of EF 6 features, see the list here.

Here we will look at getting started with Entity Framework 6 beta 1, and a couple of improvements that makes adding many rows to a SQL Server Compact database via Entity Framework feasible, and also have look at using my SqlCeBulkCopy library to do the same.

I will use a console app for this project in order to focus on the Entity Framework code. To get started, launch Visual Studio, and create a new Console Application. Lets call it EF6Test.

image

Now let’s add Entity Framework 6 beta 1 SQL Server Compact package. Launch the NuGet Package Mangager Console (from Tools, Other Windows) and run this command:

PM> Install-Package EntityFramework.SqlServerCompact -Pre

(The –Pre switch allows you to install pre-release packages)

You should now see several messages in the window, the last one being:

Successfully added 'EntityFramework.SqlServerCompact 6.0.0-beta1-20603' to EF6Test.

This process has added a number of DLL references to the project, and added an app.config file to the project, with an entityFramework section that specifies the SQL Server Compact default connection factory:

<entityFramework>
  <defaultConnectionFactory type="System.Data.Entity.Infrastructure.SqlCeConnectionFactory, EntityFramework">
    <parameters>
      <parameter value="System.Data.SqlServerCe.4.0" />
    </parameters>
  </defaultConnectionFactory>
  <providers>
    <provider invariantName="System.Data.SqlClient" type="System.Data.Entity.SqlServer.SqlProviderServices, EntityFramework.SqlServer" />
    <provider invariantName="System.Data.SqlServerCe.4.0" type="System.Data.Entity.SqlServerCompact.SqlCeProviderServices, EntityFramework.SqlServerCompact" />
  </providers>
</entityFramework>

Now add a using statement:

using System.Data.Entity;
And add the following 2 classes before “class Program”, these define our single test table and our DbContext:
    public class Student
{
public int StudentId { get; set; }
public string Name { get; set; }
}

public class StudentContext : DbContext
{
public DbSet<Student> Students { get; set; }
}

Now add the following code to the Main method:


   1:              Stopwatch sw = new Stopwatch();
   2:              bool useSqlCeBulkCopy = false;
   3:              var students = CreateStudents();
   4:   
   5:              Database.SetInitializer(new DropCreateDatabaseAlways<StudentContext>());
   6:              
   7:              using (var db = new StudentContext())
   8:              {
   9:                  db.Database.Initialize(true);
  10:                  if (!useSqlCeBulkCopy)
  11:                  {
  12:                      sw.Restart();
  13:                      //AddRange rulez, no need for db.Configuration.AutoDetectChangesEnabled = false;
  14:                      db.Students.AddRange(students);
  15:                      sw.Stop();
  16:                      
  17:                      Console.WriteLine(
  18:                          "Added 8000 entities in {0}", sw.Elapsed.ToString());
  19:                      
  20:                      sw.Restart();
  21:                      int recordsAffected = db.SaveChanges();
  22:                      sw.Stop();
  23:   
  24:                      Console.WriteLine(
  25:                          "Saved {0} entities in {1}", recordsAffected, sw.Elapsed.ToString());
  26:                      
  27:                  }
  28:                  Console.ReadKey();
  29:              }
  30:          }
  31:   
  32:          private static List<Student> CreateStudents()
  33:          {
  34:              var students = new List<Student>();
  35:              for (int i = 0; i < 8000; i++)
  36:              {
  37:                  var student = new Student { Name = Guid.NewGuid().ToString() };
  38:                  students.Add(student);
  39:              }
  40:              return students;
  41:          }


The CreateStudents method simply creates a List object with 8000 Student objects. A new database is created on each run (line 5) and the students are added to the StudentContext DbContext, using the excellent new AddRange method, similar to the LINQ to SQL InsertAllOnSubmit method. With EF5 you only had the Add method, and to get reasonable performance, you had to use the cryptic db.Configuration.AutoDetectChangesEnabled = false statement.


With SQL Server Compact and EF5, inserting 8000 rows takes about 58 seconds on my PC, and it may even time out on yours… Thanks to the fact that Entity Framework is now open source on CodePlex I was able to submit  a bug fix, which  got accepted for EF6, so the process now takes about 8 seconds on my PC.


To compare, let’s add the SqlCeBulkCopy NuGet package and perform the same process using that. In the Package Manager Console. type


PM> Install-Package ErikEJ.SqlCeBulkCopy


Before Console.ReadKey, paste the following code:

                else
{
using (SqlCeBulkCopy bcp = new SqlCeBulkCopy(db.Database.Connection.ConnectionString))
{
bcp.DestinationTableName = "Students";
sw.Restart();
bcp.WriteToServer(students);
sw.Stop();

Console.WriteLine(
"Saved {0} entities using SqlCeBulkCopy in {1}", students.Count, sw.Elapsed.ToString());
}
}


And set useSqlCeBulkCopy = true.On my machine this takes about 150 ms! So despite the improvements made in EF6 beta 1, for larger data loads, I suggest you use SqlCeBulkCopy, and as you can see from the code above, it is very easy to integrate in an Entity Framework context.


You can download the completed project from here: http://sdrv.ms/18NaRmW

Wednesday, December 19, 2012

Integrating Red Gate SmartAssembly in the SQL Server Compact Toolbox

In the next release of the SQL Server Compact Toolbox, which is currently available in an alpha release, I will start using Red Gate SmartAssembly for Error Reporting and quality improvement. In this blog post I will describe the few steps required to integrate SmartAssembly with the Visual Studio VISX build process and in code. Some of these steps are not well documented on the SmartAssembly support site, as in this case we are protecting a DLL file, not an .exe (the more common case), so I thought I would share my findings.

SmartAssembly is a .NET instrumentation tool, that offers centralised error reporting and feature usage tracking (it also offers various obfuscation features, but I am not using these), and includes a nice desktop client, that integrates all the features of the product in a single UI, including viewing your Error Reports and Feature Usage statistics.

image

MSBuild integration

Once you have downloaded SmartAssembly, you can create a new SmartAssembly project (.saproj file) – do this for your add-in DLL, and save the file. Then look at the useful instructions on this support page. You will need to make a change to the instructions on that page, and possibly also your .saproj file:

In your .csproj file (VISX Add-In project), change the SmartAssembly build task to run AfterCompile, not AfterBuild, like this, and add OverwriteAssembly="True" :

<Target Name="AfterCompile" Condition=" '$(Configuration)' == 'Release' ">   

<SmartAssembly.MSBuild.Tasks.Build OverwriteAssembly="True" ProjectFile="C:\Data\SQLCE\CodePlexTFS\TFS07\SqlCeToolbox\SqlCe35Toolbox\SqlCeToolbox.saproj" />

</Target>

Change the source file in you .saproj file to point to the DLL file in the obj folder, not the bin folder, like so:

<MainAssemblyFileName>.\obj\Release\SqlCeToolbox.dll</MainAssemblyFileName>

This will allow SmartAssembly to instrument your DLL after it has been built, but before it is added to the .VSIX file (which is a .zip file)


Invoking Error Reporting in Code

As the Toolbox is an add-in, I prefer not to catch any unhandled Visual Studio exceptions, but would still like to be able to report any errors occurring in the Toolbox, in order to be able to improve it. SmartAssembly easily allows you to to this.

Start by adding references to  SmartAssembly.ReportException.dll and SmartAssembly.ReportUsage.dll in the C:\Program Files\Red Gate\SmartAssembly 6\SDK\bin folder from your project.

Then in order to invoke Error Reporting, use:

SmartAssembly.ReportException.ExceptionReporting.Report(ex);


Then when a handled exception occurs, the user will see this dialog:

image

And to report usage use:

SmartAssembly.ReportUsage.UsageCounter.ReportUsage(feature);

Where feature is the name of the feature in question.


Hope you found it useful.

Tuesday, June 19, 2012

HOW TO: Connect to SQL Server Compact from F#

I have previously blogged about connection to SQL Server Compact from other technologies than pure ADO.NET:

ASP Classic

VBA (Excel)

Silverlight

PowerShell

F# version 3.0 in Visual Studio 2012 makes it relatively easy to connect to a SQL Server Compact database (I am NOT a F# programmer, and even I could connect, so it must be very easy!).

In this blog post I will show the required steps to connect to a SQL Server Compact 4.0 database file and start using it via Entity Framework with F#.

In VS 2012 (currently RC), create a new F# application:

image

Now add references to the required libraries (Entity Framework and F# Type Providers):

FSharp.Data.TypeProviders
System.Data.Entity
System.Data.Linq

image

I order to access SQL Server Compact via EF 4 from F#, and Entity Data Model file (.EDMX) file is required. And the EDMX Wizard and Designer only works with C# and VB.NET projects, so to create this, add a Visual C# Console project to the solution:

image

Now add the EDMX file to this project, right click the project, select Add, New Item…, Data,

image

Select generate from database, and point to the desired SQL Server Compact 4.0 database.

Just say no:

image

The Console project now contains an EDMX file, and a useful connection string in app.config.

Now go back to the F# project clear program.fs, and add the following “using” statements:

open System
open System.Data.Linq
open System.Data.EntityClient
open Microsoft.FSharp.Data.TypeProviders


Grab the connectionString value from the console project app config, and add this line:

let internal connectionString = "metadata=res://*/;provider=System.Data.SqlServerCe.4.0;provider connection string='data source=C:\\Data\\SQLCE\\Test\\nw40.sdf';"


Notice the changes to the provider connection string - =&quot; has been change to single quote, and backslashes have been escaped.


Now add the EDMX file from the Console project to the F# project as Content:


image


You can now initialize the EF type provider like so:

type internal edmx = EdmxFile<"NWModel.edmx">


And start using the context like this:

let internal context = new edmx.nw40Model.nw40Entities(connectionString)

let internal res = query { for supplier in context.Suppliers do select supplier }

res|> Seq.iter (fun supplier -> printfn "%s" supplier.Company_Name)

let wait = Console.ReadKey()