Monday, February 3, 2014

Entity Framework 6 & SQL Server Compact 4.0 (4) - Restoring full EF Tools support in Visual Studio 2013

As described in my blog post here, Entity Framework Tools support for SQL Server Compact 4.0 in Visual Studio 2013 is broken, because SQL Server Compact is no longer supported by Server Explorer in VS 2013. The latest release of my SQL Server Compact Toolbox, version 3.7.1, currently available in beta release from here, restores the Entity Framework Tools support for SQL Server Compact 4.0 by installing a simple DDEX provider.

Developing DDEX providers is a bit of a dark art, which has put me off even thinking about it, but a recent discussion on CodePlex drew my attention to the DDEX sample provider included with the Entity Framework source code. In particular the fact that the Entity Framework Tools does not get any information from the DDEX provider apart from the connection information, so all Tables, Columns etc. are enumerated via code in the Entity Framework provider, not the DDEX provider. Quote from the included Word document: “Thus, the information shown in the wizard GUI comes directly from the EF provider. The wizard lets users select which tables, views and stored procedures to include in the model”.

So my “simple” provider enables you to use the Entity Framework Tools, for example “Generate Model from Database”, “Generate Database from Model”, “Update Model from Database” and also the EF Power Tools Reverse engineer feature. (Soon to be included directly in the EF Tools).

Once the DDEX Provider has been installed, (which consists of placing the provider DLL on disk, and add a number of registry entries), you can add a connection to any SQL Server Compact 4.0 database from the Toolbox, and it will be added to Server Explorer:

image

(If you do not see the label at the bottom, but potentially a warning instead, one of the requirements for using the provider have not been fulfilled)

The requirements for the provider are:
- Visual Studio 2013 Pro or higher (it is not possible to add 3rd party DDEX providers to any Express edition, please correct me if I am wrong)
- The Simple DDEX provider must be registered (may require a VS restart after launching with version 3.7.1 the first time), you can verify via About dialog in Toolbox.
- The 4.0 DbProvider must be properly registered, use the About dialog in the Toolbox to confirm:

image

Finally, you can of course confirm the presence of the provider in the Server Explorer Choose Data Source dialog:

image

To connect via Server Explorer, select the “SQL Server Compact 4.0 (Simple by ErikEJ)” data source, click continue, and all you normally would need to enter is the path to the database file:

image

Notice that this UI does not let you create a new database file, but you can do that from the “Add Connection…” dialog in the Toolbox.

With that in place, you have access to the exact same Entity Framework Tools features that you had in Visual Studio 2012. Happy coding (and please let me know if your encounter any issue with this feature)

Thursday, January 23, 2014

Entity Framework 6 & SQL Server Compact (3)–Getting started with the SQL Server Compact 3.5 provider (and Merge Replication)

As you may know, SQL Server Compact version 4.0 does not have support for Merge Replication and Remote Data Access (you can still use RDA, however). This was a showstopper if you wanted to use the latest version of Entity Framework, as up until now, only SQL Server Compact version 4.0 was supported with Entity Framework 5 and 6. But now a SQL Server Compact 3.5 provider for Entity Framework 6 is available, currently as pre-release on NuGet.

The new 3.5 provider is based on the exact same codebase as the 4.0 provider, and thus has all the new features (SqlCeFunctions, Migrations etc.), bug fixes and performance improvements included in the 4.0 provider. In addition, this new provider supports IDENTITY Keys, just like the 4.0 provider. (A showstopper for many with the present 3.5 provider). As it is based on the same codebase as the 4.0 provider, any future improvements and bug fixes will also be included with this provider.

This blog post will describe how you can get started with the new 3.5 provider with Entity Framework 6, and will also include some pointers on getting started with Merge Replication. I will assume that you have Visual Studio 2012 or 2013 Professional or higher installed, and also have my SQL Server Compact Toolbox add-in installed. If you are using Visual Studio 2012 and Database First, you must also have the Entity Framework 6.0.2 Tools installed, download from here. And of course you must have the SQL Server Compact 3.5 SP2 Desktop runtime installed.

So let us create a new console app, that uses Entity Framework 6 and SQL Server Compact 3.5, and which could potentially be a Merge Replication subscriber.

Create a new Console project:

image

For this walkthrough, we will use Database First, but you can of course also use Code First.

Add the EntityFramework.SqlServerCompact.Legacy NuGet package to the project (remember to allow pre-releases), by right clicking the project and selecting Manage NuGet Packages…

image

This will install Entity Framework 6.1-alpha1 and the 3.5 provider and add the required registration in app.config.

Build the project.

Connect/create the database that you want to use in the SQL Server Compact Toolbox, right click it, and select “Add Entity Data Model to current Project”

image

Just click OK:

image

This will add Chinook.edmx and invoke code generation that builds a DbContext derived class and POCO classes for each table in your database.

You can now add Merge Replication to your solution, you can start by installing my Merge Replication client helper library via NuGet, http://www.nuget.org/packages/ErikEJ.SqlCeMergeLib/, read more about it here: https://sqlcemergelib.codeplex.com/

In order to configure Merge Replication on your SQL Server database and web server, I have a brief blog post here, but otherwise I can highly recommend the book by Rob Tiffany.

Notice that if you want to add Merge Replication to a SQL Server 2012 database, you need SP1 and CU4 or later, and you will need a recent build (8088 or newer) of the SQL Server Comapct 3.5 runtime installed, as listed in my blog post here.

Hopefully you will now be able to get started with this combination of the latest Microsoft data access technology and  “legacy” technologies like Merge Replication and Sync Framework. If you have any questions, please ask in the MSDN forum or Stack Overflow.

Friday, January 10, 2014

SQL Server Compact Toolbox 3.7–Visual Guide of new features

After more than 235.000 downloads, version 3.7 of my SQL Server Compact Toolbox extension for Visual Studio 2013, 2012 and 2010 is now available for download (and available via Tools/Extensions in Visual Studio). This blog post is a visual guide to the new features included in this release, many suggested by users of the tool via the CodePlex issue tracker. A major “theme” for this release has been to improve the experience for Visual Studio 2013 users, which has no Server Explorer/DDEX support for SQL Server Compact at all.

Add Column, Index and Foreign Key to table

As Server Explorer support is completely missing in VS 2013, and only available for 4.0 in VS 2012, I have added dialogs for building script to add columns, indexes and foreign keys to a table. Right click any table, and select the desired dialog:

image

image

image

  image

Note that currently the Index and Foreign Key dialogs only support a single column, I am aware of this, so please vote here and/or here.

Generate Entity Framework 6 Entity Data Model with VS 2012 and SQL Compact 3.5

The code generation menu items have now been moved to a sub-menu:

image

In addition, as the Entity Framework Tools are now available for Visual Studio 2012 as well as Visual Studio 2013, it is now possible to generate a “database first” Entity Framework model (EDMX) based on a SQL Server Compact database in VS 2012. And I have just contributed an Entity Framework SQL Server Compact 3.5 provider (available as prerelease on NuGet), that allows you to use SQL Server Compact 3.5 with Entity Framework 6. 

Copy database file

It is now possible to copy a database file, and then for example paste it into your project, should you so desire, simply by pressing Ctrl+C on the selected database, or selecting the context menu item:

image

Data only export to SQL Server

The current data export feature has been enhanced to support SQL Server and IDENTITY columns by using DBCC CHECKINDENT instead of the unsupported ALTER TABLE statements currently used.

image

New "ALTER column" context menu item

To help you modify columns, a new context menu to script ALTER COLUMN statements has been added:

image

“Database designer”

I am now hosting a web based database designer based on http://code.google.com/p/wwwsqldesigner/ (which implements only the SQL Server Compact column data types). Current state is “alpha” (and there are known issues with IE 11)!

Server DGML now has table selection
When generating a database diagram for a SQL Server database, you can now select which tables to include in the graph, which can be helpful when diagramming databases with many tables. I have already blogged about this earlier.
Other improvements and bug fixes

Missing database files indicated in tree view
No longer depends on the SQL Server Compact 3.5 runtime, and no longer depends on DbProviderFactory, simply requires either 3.5 or 4.0 in GAC
Each Query opens in new window
BUG: "Upgrade to 4.0" was blocked in Visual Studio 2013
BUG: Not ideal support for Dark Theme in VS 2012/2013 (improved slightly)
BUG: EF6 EDMX code generation with VB was broken

Thursday, January 2, 2014

SQL Server - using newsequentialid() as a function, similar to newid()

This blog post shows how you can use newsequentialid() as a function in scripts etc., not only as a column default value.

In many scenarios, unique identifiers are used a clustered, primary keys in database tables for various reasons. This blog post will not discuss the pros and cons of doing this.

Usage of GUID/uniqueidentifer and it’s implication on fragmentation, and how newsequentialid() can help improve this, has been documented in various places

A limitation of newsequentialid() is that it can only be used as a default value for a column, not as a function, in for example ad-hoc INSERT scripts. By taking advantage of SQLCLR, this situation can be changed.

using System;
using System.Data.SqlTypes;
using Microsoft.SqlServer.Server;
using System.Data.SqlClient;

public class SqlFunctions
{
[Microsoft.SqlServer.Server.SqlFunction(DataAccess = DataAccessKind.Read)]
public static SqlGuid newsequentialid()
{
using (SqlConnection connection = new SqlConnection("context connection=true"))
{
connection.Open();
var sql = @"
DECLARE @NewSequentialId AS TABLE (Id UNIQUEIDENTIFIER DEFAULT(NEWSEQUENTIALID()))
INSERT INTO @NewSequentialId DEFAULT VALUES;
SELECT Id FROM @NewSequentialId;"
;
using (SqlCommand cmd = new SqlCommand(sql, connection))
{
object idRet = cmd.ExecuteScalar();
return new SqlGuid((Guid)idRet);
}
}
}

}

The code above implements a SQLCLR function named newsequentialid(), To build this code, simply create a C# class library, include the code, and build. The code is inspired by this thread on SQLServerCentral: http://www.sqlservercentral.com/Forums/Topic1006731-2815-1.aspx


To make deploying the function even simpler, the script outlined below can add the assembly code to your database and register the function:

EXEC sp_configure @configname=clr_enabled, @configvalue=1;
GO
RECONFIGURE;
GO

IF NOT EXISTS (SELECT * FROM sys.assemblies asms WHERE asms.name = N'SqlFunctions' and is_user_defined = 1)
CREATE ASSEMBLY [SqlFunctions]
FROM 0x4D5A… (rest omitted, use full script)
WITH PERMISSION_SET = SAFE

IF NOT EXISTS (SELECT * FROM sys.objects WHERE object_id = OBJECT_ID(N'[dbo].[newsequentialid]') AND type in (N'FN', N'IF', N'TF', N'FS', N'FT'))
BEGIN
execute dbo.sp_executesql @statement = N'
CREATE FUNCTION [dbo].[newsequentialid]()
RETURNS uniqueidentifier
AS EXTERNAL NAME [SqlFunctions].[SqlFunctions].[newsequentialid];
'

END
GO


You can download the full script from here: http://sdrv.ms/1hhYDY1


Testing with 50.000 inserts, like in the CodeProject article reveals the following figures:


Newsequentialid as DEFAULT:
Run time: 1:18, pages: 1725, fragmentation: 0,7 %


Newsequentialid as function in INSERT statement, no default value on table:
Run time: 2:03, pages: 1725, fragementation: 0,7 %


To use the function as a replacement for newid(), simply use dbo.newsequentialid() instead. But please also consider using another column as clustering key in your table…

Sunday, December 15, 2013

Document your SQL Server database with free tools: SQL Server Compact Toolbox and DB>Doc

In this blog post I will highlight an overlooked feature in my SQL Server Compact Toolbox (Visual Studio add-in or standalone), the ability to create interactive relationship diagrams of SQL Server databases. And in combination with the free, open source DB>Doc for SQL Server, you have a full suite of documentation tools.

In order to create a diagram showing tables, columns and relationships for your SQL Server database, install the Toolbox.

Right click the root node of the Toolbox window, and select “Create SQL Server Database Graph (DGML)”:

image

Select the database that you want to diagram (the tool needs SELECT permission on the system views in the database)

image

You can also select to diagram only a subset of the tables in the database:

image

You will be prompted for a location to save the DGML file, enter this, and click OK, and Visual Studio will show the generated diagram in the DGML viewer, that comes with Visual Studio 2012 Pro or higher:

image

The viewer is quite advanced, from the Layout menu you can choose between various layouts of the dependency graph, and other advanced features to analyse the graph, for example. From the viewer you can Share as Image or XPS.
UPDATE: With the DGML Power Tools installed, you can also share a .SVG, which you can view in any web browser.

image

Click on a table, and select the down arrow button to expand the table into columns, and refer to the Legend also displayed (via the Legend menu item in the viewer):

image

More information on working with the graphs is available on MSDN:

Browse and Rearrange Dependency Graphs

Edit and Customize Dependency Graphs

To create HTML/XML based documentation of your database columns, you can use the open source DB>Doc tool. The main idea [of this tool] is to serve as a complementary tool to database diagrams, focusing on columns in tables and their meaning (common database diagrams focus to entity relationships).

I also use this tool for the documentation feature in the Toolbox for SQL Server Compact database files, which produces output similar to this:

image

Happy documenting! And feel free to provide feedback at https://sqlcetoolbox.codeplex.com/WorkItem/Create

Monday, December 2, 2013

The trouble with Any CPU–Prefer 32 bit–BadImageFormatException

In my previous 2 blog posts here and here, I have briefly mentioned the new default Target Platform for new .NET 4.5/4.5.1 projects in Visual Studio 2012/2013. To be perfectly honest, it was not exactly clear why this was an issue with the SQL Server Compact ADO.NET provider, so I decided to dig a little deeper.

To read more about the new default Platform target option introduced in .NET 4.5, see the MSDN documentation here, and the blog post here.

image

Why is this Target platform an issue for the SQL Server Compact provider?

Let’s find out how the provider detects if it is running on a x86 or x64 (AMD64) system. In .NET 4.0, two new properties were introduced, System.Environment.Is64BitProcess and System.Environment.Is64BitOperatingSystem (for a nice overview of their implementation see this blog post. But the provider code is old, and uses a different method: It looks at the PROCESSOR_ARCHITECTURE environment variable, and assumes that it reflects the value of the current process bitness (possible values are x86 and AMD64 on a Intel x64 system). In fact, it first looks in the .exe folder for a valid version of sqlceme40.dll, and if not found, then in a subfolder named after the processor architecture (ie x86 or AMD64).

In order to test how an app responds, I then made a small .NET 4.5 console app to test the values of the new Environment properties and the PROCESSOR_ARCHITECTURE value. I added the SQL Server Compact NuGet package (Microsoft.SqlServer.Compact) to test how the engine responds using Private Deployment under the four different Target Platform options. And I uninstalled the SQL Server Compact 4.0 runtime from Add/Remove Programs, so it is no longer in the GAC.

string path = @"c:\temp\test.sdf";
Console.WriteLine("Is64BitOS: " + System.Environment.Is64BitOperatingSystem);
Console.WriteLine("Is64BitProc: " + System.Environment.Is64BitProcess);
Console.WriteLine("PROCESSOR_ARCHITECTURE: " + System.Environment.GetEnvironmentVariable("PROCESSOR_ARCHITECTURE"));
Console.ReadKey();
if (System.IO.File.Exists(path))
System.IO.File.Delete(path);
using (SqlCeEngine engine = new SqlCeEngine(string.Format("Data Source={0}", path)))
{
engine.CreateDatabase();
}


1: Output with Any CPU, Prefer 32 bit:


Is64BitOS: True
Is64BitProc: False
PROCESSOR_ARCHITECTURE: AMD64


And getting error: Unable to load the native components of SQL Server Compact corresponding to the ADO.NET provider of version 8876.

As you can see even if it is a 32 bit process, the PROCESSOR_ARCHITECTURE variable has the “wrong” value, causing the SQL Server Compact ADO.NET provider System.Data.SqlServerCe.dll to try to load the dll files from the AMD64 folder in a 32 bit process.


2: Output with Any CPU, Prefer 32 bit unchecked:


Is64BitOS: True
Is64BitProc: True
PROCESSOR_ARCHITECTURE: AMD64


- and no errors


3: Output with x64:


Is64BitOS: True
Is64BitProc: True
PROCESSOR_ARCHITECTURE: AMD64


- and no errors


4: Output with x86:


Is64BitOS: True
Is64BitProc: False
PROCESSOR_ARCHITECTURE: x86


- and no errors


Hopefully this blog post will prevent some form getting bitten by this “issue”, which also affects the SQLite ADO.NET provider.

Monday, November 25, 2013

Entity Framework 6 & SQL Server Compact 4 (2)–Easy Private Desktop Deployment

UPDATE: Instead of using the NuGet package mentioned below, use the package mentioned in this newer blog post: http://erikej.blogspot.dk/2014/10/entity-framework-6-and-sql-server.html

In this post I will describe a simplified approach to SQL Server Compact Private Desktop Deployment with Entity Framework 6, for an overview blog post on Private Deployment with SQL Server Compact, see my blog post here.

When using Private Deployment with Entity Framework 6, due to the fact that the EntityFramework.SqlServerCompact also installs the SQL Server Compact NuGet package, we must use a slightly different approach from what I described here in order to keep thing simple. The main difference is that we must force the project to use x86 Target Platform rather than AnyCPU, Prefer 32 bit. This is due to the fact that when running Prefer 32 bit, the SQL Server Compact ADO.NET provider loads the wrong files, as the PROCESSORPLATFORM in this case remains AMD64 on 64 bit systems, but the executing .NET Framework is the x86 version.

To read more about the new default Platform target option introduced in .NET 4.5, see the MSDN documentation here, and the blog post here.

In addition, I will demonstrate how to use my SQL Server Compact Toolbox to quickly get started with a Database First workflow.

For the sake of simplicity, and in order to focus attention on the private deployment aspects, I will demonstrate with a console application, but the same approach will also work for WinForms and WPF applications. The approach will NOT work for dll output projects, like for example add-ins and similar, as it relies on configuration entries in app.config. And this blog post is about deployment, not layered architectures. 

In short, we need to do the following:

1: Create a project and set Target Platform to x86

2: Add the EntityFramework.SqlServerCompact.PrivateConfig NuGet package to the project

3: Add our database file as project content

4: Create EDMX (or Code First classes) and adjust connection string

5: Add code to properly deploy the database file during app launch

But let’s expand on each task below.

Before you get started, make sure you have the following installed:

1: Visual Studio 2013 Pro or higher.

2: The latest version of  my SQL Server Compact Toolbox add-in (Install via Tools/Extensions in VS). The Toolbox requires the SQL Server Compact 3.5 SP2 and 4.0 SP1 runtimes to be installed (the 3.5 requirement will be lifted in the next release of the Toolbox)

3: An existing SQL Server Compact database file, I will use Chinook

With that in place, let us open Visual Studio and get started:

Create new console application

Go to File, New Project, and create a new Windows Console application. Make sure to set the target platform to 4.0 or newer.
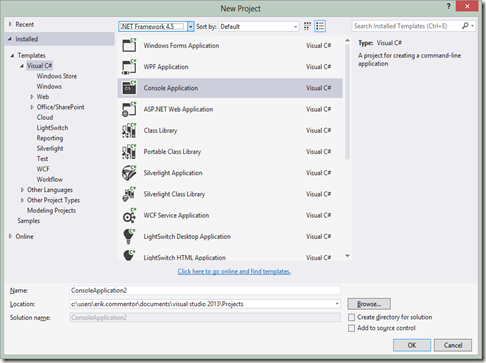
image_thumb3

Now set the Target Platform to x86 (this is an important step, if you forget to do this you will get a BadImageFormat exception during runtime/debug)

Go to the project properties, and select the Build section/tab, and choose x86:
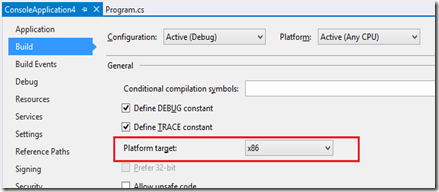
image

Install Entity Framework 6 from NuGet

To get the latest and greatest Entity Framework 6 bits, always install from NuGet. And thanks to the amazing package dependency resolution features of NuGet, just install the single required package, and the remaining packages will be installed as dependencies. In this case, the only thing that is missing from the EntityFramework.SqlServerCompact package (which depends on SQL Server Compact 4 and EF6) is a DbProvider registration in the app.config file, that enables you to run without the SQL Server Compact runtime installed in GAC and machine.config. To fix this “"misssing link”, I have created the http://www.nuget.org/packages/EntityFramework.SqlServerCompact.PrivateConfig/ 

package, which simply adds the missing config entries and in turn depends on all other required packages. It adds this to the app.config file:

  <system.data>
<DbProviderFactories>
<remove invariant="System.Data.SqlServerCe.4.0" />
<add name="Microsoft SQL Server Compact Data Provider 4.0" invariant="System.Data.SqlServerCe.4.0" description=".NET Framework Data Provider for Microsoft SQL Server Compact" type="System.Data.SqlServerCe.SqlCeProviderFactory, System.Data.SqlServerCe, Version=4.0.0.0, Culture=neutral, PublicKeyToken=89845dcd8080cc91" />
</DbProviderFactories>
</system.data>


In other words, simply install the EntityFramework.SqlServerCompact.PrivateConfig package. Right click the References folder in your project, and select Manage NuGet Packages. Search for the package name and install it. And all required packages and references will be installed. (I am working on getting these config entries added to the base EntityFramwork.SqlServerCompact package, in order to make things more streamlined)


Add your database file to the project


I will use Chinook, which you can install from NuGet. But of course feel free to use your own database file.


Find the Chinook SQL Server Compact database package, and install it:
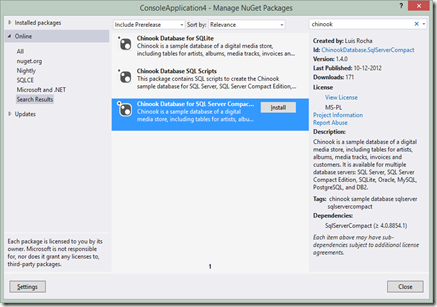

image


Make sure to mark the database file as Content, Copy Always in the project. I will describe later in this post how to place it correctly on the end users PC.
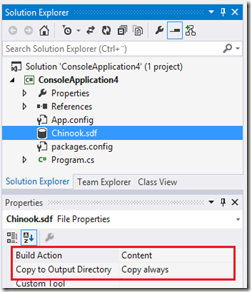


image


 Create the Entity Data Model (EDMX) and adjust the connection string


Build the project.


Now in the SQL Server Compact Toolbox, connect to the database file in your project folder:
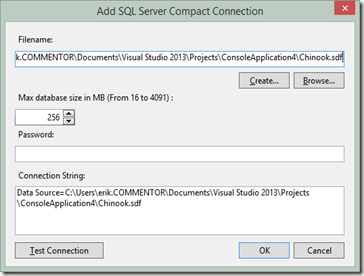


image


Right click the database, and select the “Add Entity Data Model (EDMX) to current project” menu item:
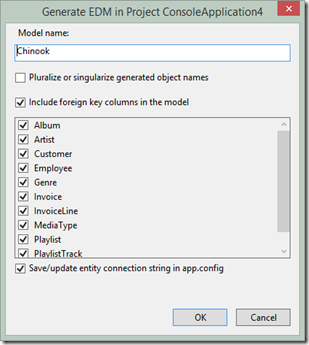


image


Click OK, and the EDMX file and various other files will be added to your project:
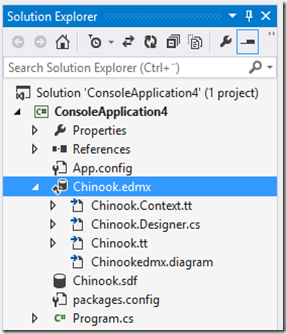


image


Build the project.


Now let us add some test code to the Main method in order to verify that everything works so far:

using (var context = new ChinookEntities())
{
foreach (var album in context.Album.ToList())
{
Console.WriteLine(album.Title);
}

}
Console.ReadKey();


We can now access the database via the generated object model, and do not have to type SQL, but can use LINQ to Entities to query the database. In addition, we can update the database (INSERT, UPDATE, DELETE) via methods on the derived DbContext class, ChinookEntities. In app.config, the following connection string has been added:

  <connectionStrings>
<add name="ChinookEntities" connectionString="metadata=res://*/Chinook.csdl|res://*/Chinook.ssdl|res://*/Chinook.msl;provider=System.Data.SqlServerCe.4.0;provider connection string=&quot;Data Source=C:\Users\erik.COMMENTOR\Documents\Visual Studio 2013\Projects\ConsoleApplication4\Chinook.sdf&quot;"
providerName="System.Data.EntityClient" />
</connectionStrings>


In order to make the connection string user and folder independent, change the data source as follows:

<connectionStrings>
<add name="ChinookEntities" connectionString="metadata=res://*/Chinook.csdl|res://*/Chinook.ssdl|res://*/Chinook.msl;provider=System.Data.SqlServerCe.4.0;provider connection string=&quot;Data Source=|DataDirectory|\Chinook.sdf&quot;"
providerName="System.Data.EntityClient" />
</connectionStrings>


Deploy the database file


The final step will be done to ensure that the database file will be located in a writeable location on the users machine when deployed/installed. We will simply do this in code in order to not depend on any install actions and issues. We will use the same approach that I have already used in my blog post here, which takes advantage of the DataDirectory connection string macro. So add this piece of code to the Program class:

private const string dbFileName = "Chinook.sdf";
private static void CreateIfNotExists(string fileName)
{
string path = Environment.GetFolderPath(Environment.SpecialFolder.ApplicationData);
// Set the data directory to the users %AppData% folder
// So the database file will be placed in: C:\\Users\\<Username>\\AppData\\Roaming\\
AppDomain.CurrentDomain.SetData("DataDirectory", path);

// Enure that the database file is present
if (!System.IO.File.Exists(System.IO.Path.Combine(path, fileName)))
{
//Get path to our .exe, which also has a copy of the database file
var exePath = System.IO.Path.GetDirectoryName(
new Uri(System.Reflection.Assembly.GetExecutingAssembly().CodeBase).LocalPath);
//Copy the file from the .exe location to the %AppData% folder
System.IO.File.Copy(
System.IO.Path.Combine(exePath, fileName),
System.IO.Path.Combine(path, fileName));
}
}


Remember to add a call to CreateIfNotExists as the first line in the Main method:

static void Main(string[] args)
{
CreateIfNotExists(dbFileName);


You can now use ClickOnce, XCopy or an Installer to deploy your app (the files in the release folder), with no other requirements than the target .NET Framework version. Uninstall the 4.0 runtime from your PC in order to test (and/or test on another PC without SQL CE 4.0 installed)


What we have achieved:


- Simple, self contained deployment of a single user desktop app of any type to any .NET 4.0 or higher platform (not ARM, though)


- Automated creation of the required settings in app.config via NuGet packages


- RAD (Rapid App Development) “Database First” access to a well-performing, well-documented and powerful ORM.


You can download the complete solution (without packages) from here.