Sunday, February 27, 2011

Access SQL Server Compact 4 with ASP Classic and VbScript

Now that you can use SQL Server Compact 4 with ASP.NET, some developers wonder if you can also use it with ASP Classic. To access with ASP Classic, the SQL Server Compact 4.0 OLEDB provider must be installed on the system, so the 4.0 MSI must be installed by an administrator – no private deployment.

But YES, you can access a SQL Server Compact 4 database file from ASP Classic:

 image

(The url is: http://localhost/aspclassic/default.asp)

Of course the required read/write permissions must be given the the relevant process user to the folder where the database file is located.

Here is the code to do it:

<html>
<head>
    <title>Test SQL Compact 4 and ASP Classic + ADO</title>
</head>
<body>

<%

set conn = Server.CreateObject("ADODB.Connection")

strCnxn = "Provider=Microsoft.SQLSERVER.CE.OLEDB.4.0;" & _
    "Data Source=C:\inetpub\wwwroot\AspClassic\App_Data\nw40.sdf;"

conn.Open strCnxn

set rs = Server.CreateObject("ADODB.recordset")
rs.Open "SELECT TABLE_NAME FROM INFORMATION_SCHEMA.TABLES", conn

do until rs.EOF
    for each x in rs.Fields
       Response.Write(x.name)
       Response.Write(" = ")
       Response.Write(x.value & "<br />")
    next
    Response.Write("<br />")
    rs.MoveNext
loop
'
rs.close
conn.close
%>

</body>
</html>

Monday, February 21, 2011

Using SQL Server Compact 4.0 with Desktop Private Deployment and a Setup project (MSI) (part 2)

I my previous post in this 2 part series, I demonstrated how to use SQL Server Compact 4 with Entity Framework 4 in a desktop application, despite the not excellent tools support.
This time I will show how to implement private deployment, and also how to solve other challenges related to installing via a Windows Installer file (MSI), by adding a Visual Studio Setup project to the solution.
First I will configure the project for Private Deployment, and then add a Setup project.For more information on requirements for Private Deployment, see my blog post SQL Server Compact “Private Deployment” on desktop–an overview.

Enable Private Deployment in a project

This includes copying the required SQL Server Compact 4.0 runtime files, and including these as content in the project, and modifying app.config to refer to the Private managed ADO.NET provider.
Locate the files to be copied in C:\Program Files\Microsoft SQL Server Compact Edition\v4.0\Private.
image
Copy all files and folders here to the project folder (on my system C:\projects\Chinook\Chinook.WPF).
Select “Show all files” in Solution Explorer in Visual Studio. Your project should now look similar to this:
image
Include the amd64 and x86 folder in project (right click), including all content and subfolder as Content, Copy Always. Also include the two managed DLL files in the project root (System.Data.SqlServerCe.dll and System.Data.SqlServerCe.Entity.dll). Make sure to specify “Copy Always”, or the files will not be included in the project output. Verify that all files are included by looking in the debug folder after building the project.
You should now have a project structure like this (same set of files in the x86 folder, of course):
image
Now modify your app.config to refer to the Private ADO.NET provider, which has assembly version 4.0.0.1, not 4.0.0.0 as the on in the GAC. Using this special assembly version provider will prevent assembly probing from picking up a newer version of the provider in the GAC.
<system.data>
    <DbProviderFactories>
      <remove invariant="System.Data.SqlServerCe.4.0"/>
      <add name="Microsoft SQL Server Compact Data Provider 4.0" invariant="System.Data.SqlServerCe.4.0" description=".NET Framework Data Provider for Microsoft SQL Server Compact" type="System.Data.SqlServerCe.SqlCeProviderFactory, System.Data.SqlServerCe, Version=4.0.0.1, Culture=neutral, PublicKeyToken=89845dcd8080cc91"/>
    </DbProviderFactories>
  </system.data>


Notice the version on the type entry is 4.0.0.1.
IMPORTANT: If you reference System.Data.SqlServerCe.dll, make sure to reference the 4.0.0.1 version in your project folder!


Verify that the application still runs, and displays data.

Add and configure a setup project to produce a MSI (Windows Installer) file


(This is a little involved, as I will demonstrate solutions to several deployment issues here).


Start by adding a Visual Studio Installer project to the solution, and call it Chinook.WPF.Setup


image


Create a setup for a Windows application, and add the Content Files and Primary Output from Chinook.WPF:


image


For this project, we want to include the Chinook40.sdf file and deploy it with our installer. Other options include creating the sdf file at the first application startup. So we add the Chinook40.sdf file as additional file:


image


Set the Permanent property on the Chinook40.sdf file to True, to prevent it from being removed during uninstall.


image


In the file system browser in the Setup project, add the User’s application data folder, this is where we want the sdf file placed,as this is a writable location (Program Files folder is not writable):


image


Now we can set the folder location of the sdf file to this folder:


image


So the database file will now be installed in the C:\\Users\\<Username>\\AppData\\Roaming\\ folder. Now we need to modify the connection string. We can do this by manipulating the DataDirectory location, as this is part of the connection string. Add a Startup event handler to App.xaml:


<Application x:Class="Chinook.WPF.App"
             xmlns="http://schemas.microsoft.com/winfx/2006/xaml/presentation"
             xmlns:x="http://schemas.microsoft.com/winfx/2006/xaml"
             StartupUri="MainWindow.xaml" Startup="Application_Startup">
    <Application.Resources>
         
    </Application.Resources>
</Application>


In this handler, add the following code, notice the comments (!):


private void Application_Startup(object sender, StartupEventArgs e)
        {
            // This is our connection string: Data Source=|DataDirectory|\Chinook40.sdf
            // Set the data directory to the users %AppData% folder
            // So the Chinook40.sdf file must be placed in:  C:\\Users\\<Username>\\AppData\\Roaming\\
            AppDomain.CurrentDomain.SetData("DataDirectory", Environment.GetFolderPath(Environment.SpecialFolder.ApplicationData));
        }


Finally, add a shortcut to the application in the User’s Programs Menu file system folder:


image


Move the shortcut to the User’s Programs Menu folder, and rename to Chinook.


image


Now build the Setup project (right click and select Build), and test the installer on a system without SQL Server Compact 4.0 installed. .NET 4.0 Client Profile must be installed, however. The setup will not install if this is not the case.


You can test on your development system, by uninstalling the desktop runtime:


image


Happy deployment!


You can download the completed solution from here:

https://1drv.ms/u/s!AitHcOtLnuVHgwewiWcudEGRkpEt

Monday, February 7, 2011

Using SQL Server Compact 4.0 with WPF DataGrid, Entity Framework 4 and Private deployment (part 1)

In this and a following post, I will show, how you can use SQL Server Compact 4.0 with a desktop application, despite full tool support for this. Reasons for wanting to use SQL Server Compact 4 rather than 3.5 SP2 could be: Better support for Entity Framework 4, including support for Server Generated Keys and the Code First CTP, paging support and new ADO.NET APIs such as GetSchema and SqlCeConnectionStringBuilder. For an overview of SQL Server Compact 4, see this.

I will also show how to include the SQL Server Compact DLL files for private deployment with a desktop application, including in a Visual Studio Setup project (in part 2).

I will reuse the Data Access Layer based on Entity Framework 4 and POCO classes that I created in this blog post. Notice that there is no direct tooling to create a Entity Framework Model from database in the SQL Server Compact 4 tools for Visual Studio SP1, and therefore you must use one of the workarounds described. A third workaround is to install the VS 2010 SP1 SQL Compact Tools, create the 4.0 based model in a web project, and move this model to a Class library.

Start by opening the Chinook solution, and add a new WPF Application, Chinook.WPF:

image

Add references to the 3 project that make up the Data Access Layer (Data, Model and Repository):

image

Add a WPF DataGrid to the MainWindow.xml file, so it looks like so:

<Window x:Class="Chinook.WPF.MainWindow"
xmlns="http://schemas.microsoft.com/winfx/2006/xaml/presentation"
xmlns:x="http://schemas.microsoft.com/winfx/2006/xaml"
Title="MainWindow" Height="350" Width="525">
<
Grid>
<
DataGrid AutoGenerateColumns="True" Margin="5,5,5,5" Name="dataGrid1" />
</
Grid>
</
Window>


Notice that for this demo, I have set AutoGenerateColumns=True.


Add an event handler for the Loaded event, and add this code to MainWindow.xaml.cs:


var repo = new TrackRepository();
dataGrid1.ItemsSource = repo.GetAll(null, 50, 0); ;


Also add using Chinook.Repository; to the using statements.


For this demo, let us assume that each user has her own database file. So where can we put the file – the users ApplicationData is a possibility.


Now add an app.config file with the Entity Framework connection string:


image


<?xml version="1.0" encoding="utf-8" ?>
<
configuration>
<
connectionStrings>
<
add name="ChinookEntities" connectionString="metadata=res://*/ChinookModel.csdl|res://*/ChinookModel.ssdl|res://*/ChinookModel.msl;provider=System.Data.SqlServerCe.4.0;provider connection string=&quot;Data Source=|DataDirectory|\Chinook40.sdf&quot;" providerName="System.Data.EntityClient" />
</
connectionStrings>
</
configuration>


Notice that the SQL Server Compact connection string is:


Data Source=|DataDirectory|\Chinook40.sdf


So to make the application look for the database in the proper location, we can redefine the DataDirectory macro, by adding an event handler to App.xaml.cs like so:


private void Application_Startup(object sender, StartupEventArgs e)
{
// This is our connection string: Data Source=|DataDirectory|\Chinook40.sdf
// Set the data directory to the users %AppData% folder
// So the Chinook40.sdf file must be placed in: C:\\Users\\<Username>\\AppData\\Roaming\\
AppDomain.CurrentDomain.SetData("DataDirectory", Environment.GetFolderPath(Environment.SpecialFolder.ApplicationData));
}


Now place a copy of the Chinnok40.sdf file in the proper location (on my Windows 7 PC, it is C:\\Users\\ErikEJ\\AppData\\Roaming\\, set Chinook.WPF as the startup project and run the application:


image


To make the code run faster, you can add this line to the TrackRepository.GetAll method:


context.ContextOptions.ProxyCreationEnabled = false;


You now have implemented a WPF application using Entity Framework 4 using POCO and Database First with SQL Server Compact 4.0.


In the next part I will show how to add the SQL Server Compact DLL files for private deployment, and create a MSI that installs these files and the database file, so the application can run on any machine with .NET 4.0 and a supported platform. (And .NET 4.0 being the only required component).

Part 2- Entity Framework with SQL Server Compact 4.0 and ASP.NET – Dynamic Data, OData, deployment: http://erikej.blogspot.dk/2011/01/entity-framework-with-sql-server.html


You can download the solution so far from here:


Friday, January 28, 2011

SQL Server Compact Toolbox 2.0–Visual Guide of new features

Version 2.0 of my SQL Server Compact Toolbox extension for Visual Studio 2010 is now available for download. This blog post is a visual guide to the new features included in this release, many suggested by users of the tool via the CodePlex issue tracker.

Full support for SQL Server Compact 4 and the Visual Studio 2010 SP1 Tools for SQL Server Compact 4

The list of databases in the toolbox is now pulled from three sources, Server Explorer connections to 3.5 databases, Server Explorer connections to 4.0 databases, via the new Server Tools for VS 2010 SP1, and finally your own 4.0 connections (VS 2010 SP1 not required).

image

Your “own” connections are indicated with a + sign next to the database icon. In addition, the engine version is displayed.

SQL Editor improvements

The SQL Editor has been enhanced with the following new features:

image

- Added colored syntax to editor text
- Actual plan button added to editor toolbar
- Query duration added to editor status bar
- Runtime version added to editor status bar

Upgrade to version 4.0 format

image

An option to upgrade a 3.x database file to version 4 has been added to the “Add SQL Server Compact 4.0 Connection” dialog. More information about the Upgrade api here.

SQL Compact File Version checker

image

image

A SQL Server Compact version detection function has been added, to allow you to determine if a given file is version 2, 3.0/3.1, 3,5 or 4.0 database format.

All available SQL Server Compact data types listed

image

A Data types node with documentation tooltips has been added to the Toolbox tree view.

Enhanced About dialog

image

About dialog with more detailed SQL Server Compact status information, listing the exact runtime version of the ADO.NET provider in the GAC and detecting if the associated DbProvider is properly registered in machine.config.

As always, please provide feedback, suggestions and reviews at the CodePlex site: http://sqlcetoolbox.codeplex.com

Thursday, January 13, 2011

SQL Server Compact 4.0 released!

image_thumb[1]

image_thumb[5]

WebMatrix has been released and will be launched at CodeMash on Thursday 13/1. Sign up for the live streaming event here. 

Download locations

At the same time, SQL Server Compact 4.0 (build 4.0.8482.1) has been  released to web, and is available via Web Platform Installer 3.0 and also available for download here:

Microsoft SQL Server Compact 4.0 (x86 and x64)

SQL Server Compact 4.0 Books Online

Visual Studio 2010 SP1 Tools for SQL Server Compact 4.0

(Team blog post about the VS 2010 SP1 tooling support)

Related blog posts

ScottGu has just issued a long blog post about using SQL Server Compact 4.0 with WebForms + Entity Framework Database First and MVC + Entity Framework Code First.

The SQL Compact team has a concise feature overview. And release announcement, which also includes information about scenarios not enabled with SQL Server Compact 4.0.

I have blogged about SQL Server Compact 4 at several occasions:

Getting started with SQL Server Compact 4.0 and ASP.NET 4.0 (no WebMatrix)

SQL Server Compact 4.0 news roundup

Downsize a SQL Server database to SQL Server Compact 4.0 (and 3.5)

SQL Server Compact version detector

SQL Server Compact 4.0 ASP.NET Membership provider

SQL Compact 4.0 now available as a .zip file

Using Entity Framework with SQL Server Compact 4.0 CTP and ASP.NET – tips & tricks (part one)

Entity Framework with SQL Server Compact 4.0 and ASP.NET – Dynamic Data, OData, deployment (part two)

Visual Studio Tools for SQL Server Compact 4 now available

SQL Server Compact “Private Deployment” on desktop–an overview

Comparison of SQL Server Compact 4 and SQL Server Express 2008 R2

Using SQL Server Compact 4.0 with WPF DataGrid, Entity Framework 4 and Private deployment (part 1)

Entity Framework with SQL Server Compact 4.0 and ASP.NET – Dynamic Data, OData, deployment (part two)

Using SQL Server Compact 4.0 with WPF DataGrid, Entity Framework 4 and Private deployment (part 1)

Using SQL Server Compact 4.0 with Desktop Private Deployment and a Setup project (MSI) (part 2)

Access SQL Server Compact 4 with ASP Classic and VbScript

Migrate a SQL Server Compact database to SQL Server using Web Deploy (MSdeploy)

Visual Studio 2010 Service Pack 1 with support for SQL Server Compact 4.0 released

Snapshot Synchronization with SQL Server Compact 4.0

Useful new topics in SQL Server Compact 4.0 Books Online

Saving images to SQL Server Compact with Entity Framework 4.1 Code First

Deployment improvements

The “Private” folder contains both the x64 and x86 related DLL files, and also contains the required C++ runtime DLL (new in RTM):

image

I will update my “Private Deployment” blog post with the new information.

No SQL Server Synchronization Supported

The SQL Server Compact 4.0 release does not support syncing of data with SQL Server using technologies like Microsoft Sync Framework, or merge replication, or remote data access (RDA).

Duplicate constraint names issue

The generation of the Entity Data Model for SQL Server Compact will fail if there are duplicate constraint names in the SQL Server Compact schema.

In SQL Server Compact, the constraint names are unique within a table and this can allow duplicate constraint names in the database. The behavior is different from SQL Server, where the constraint names are unique across the database. If a SQL Server Compact schema has duplicate referential integrity (primary key – foreign key relationship) constraint names, the generation of the Entity Data Model using the ADO.NET Entity Framework’s Entity Data Model Wizard will fail. The workaround is to change the name of the duplicate constraint name to be unique across the database, like by adding the name of the table to the constraint name.

I have worked around this limitation in my SQL Server Compact tools, SQL Server Compact Toolbox and SQL Server Compact Scripting Tools

Monday, January 10, 2011

SQL Server Compact 4.0 release on Jan 13?

WebMatrix will be released at CodeMash on Thursday 13/1. I expect that since WebMatrix includes SQL Server Compact 4.0, this product will release at the same time (as well as IIS Express). Sign up for the live streaming event here.

Thursday, January 6, 2011

Entity Framework with SQL Server Compact 4.0 and ASP.NET – Dynamic Data, OData, deployment (part two)

We can now use two additional technologies, that both build on Entity Framework, to add some administrative features to our Chinook music shop, with minimal amount of coding effort:

- A website for administering the rarely used tables in the database (using a Dynamic Data website)

- Access to the Invoice data in Excel (using WCF Data Services)

Since we are not using the standard Entity Framework classes, but use a POCO based Data Access Layer, we need to accommodate slightly, as I will demonstrate.

Adding Dynamic Data website

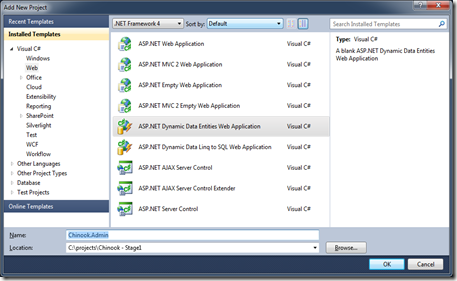
Continuing where we left in Part One, add a ASP.NET Dynamic Data Entities Web Application to the solution:
image

Set this project as the Startup project. Add references to Chinook.Data and Chinook.Model from this project.

Modify the global.asax to refer to the ChinnokEntities ObjectContext:

public static void RegisterRoutes(RouteCollection routes)
{
DefaultModel.RegisterContext(typeof(Chinook.Model.ChinookEntities), new ContextConfiguration() { ScaffoldAllTables = true });


Also set ScaffoldAllTables = true for now – this means that admin pages are created for all the entities in the context.


Copy the connectionstrings section from web.config in the Chinook.UI project to the Chinnok.Admin project web.config file.


Try to run the site – you will get this error:

Could not find the CLR type for 'ChinookModel.Track'.


This is due to the fact that we are using POCO, so the Entity Framework initializer does not load the required metadata. The solution for this is here, so we add a new class to the Chinook.Data project (called ChinookEntities.Custom.cs), with the following contents:


namespace Chinook.Model
{
public partial class ChinookEntities
{
//Dynamic Data
public ChinookEntities(bool dynamicData)
: base(ConnectionString, ContainerName)
{
var tracestring = this.CreateQuery<Genre>("ChinookEntities.Genres").ToTraceString();
}

}
}
Then use this constructor in global.asax, and also set scaffold all tables = false:


DefaultModel.RegisterContext((() => new Chinook.Model.ChinookEntities(true)), new ContextConfiguration() { ScaffoldAllTables = false });


When you now run the site, you will get this error, as no tables are available:

There are no accessible tables. Make sure that at least one data model is registered in Global.asax and scaffolding is enabled or implement custom pages.


To include the two tables in question, we must add some partial classes to the Model project. Add a reference to System.ComponentModel.DataAnnotations in the Model project, and add to new classes with the following contents:


// Dynamic Data - add ref to System.ComponentModel.DataAnnotations
// and set scaffoldtable = true to using partial class
using System.ComponentModel.DataAnnotations;

namespace Chinook.Model
{
[ScaffoldTable(true)]
public partial class MediaType
{
}
}


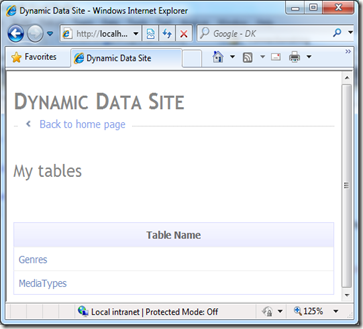
Now you can manage the Genres and MediaTypes tables:


image


Adding WCF Data Service (OData)


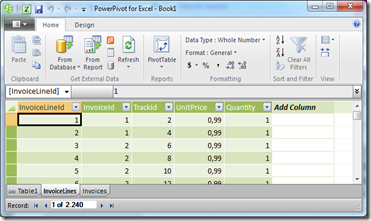
The accounting department would like to access the Invoice data in our Music Shop from Excel. PowerPivot can connect to many data sources, but not directly to a SQL Server Compact database file, and access via the OLEDB provider is broken. But PowerPivot can access an OData feed, so let’s create one to expose the SQL Server Compact Invoice and InvoiceLine tables.


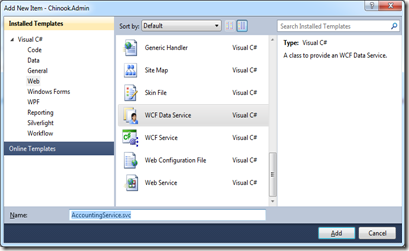
Add a WCF Data Service to the Chinook.Admin project:


image


Modify the AccountingService class as follow, and add a “using Chinook.Model” statement:


public class AccountingService : DataService<ChinookEntities>
{
public static void InitializeService(DataServiceConfiguration config)
{
config.SetEntitySetAccessRule("Invoices", EntitySetRights.AllRead);
config.SetEntitySetAccessRule("InvoiceLines", EntitySetRights.AllRead);
config.DataServiceBehavior.MaxProtocolVersion = DataServiceProtocolVersion.V2;
}

protected override ChinookEntities CreateDataSource()
{
var context = new ChinookEntities(true);
// Avoid dynamic proxies, as they cannot be serialized
context.ContextOptions.ProxyCreationEnabled = false;
return context;
}
}
We only allow read-only access to the Invoices and InvoiceLines entities. In addition, we must override CreateDataSource, to solve the problem with metadata we also had with Dynamic Data and disable ProxyCreation.


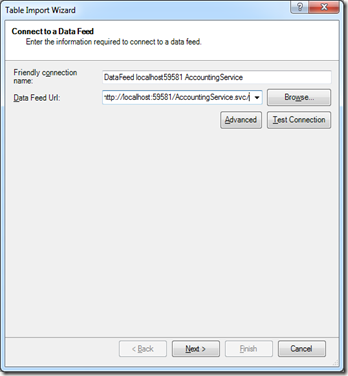
You can now point PowerPivot to the AccountingService.svc URL and access the invoice data from Excel:
image


image


Deployment


Finally a few words on deployment and connection handling. As you may know, opening and closing connections to a SQL Server Compact file is a costly operation, and there is no concept of Connection Pooling with SQL Server Compact. A way to mimic a connection pool is to keep a dummy connection (that is not otherwise used) open for the duration of your application’s lifetime. For a web application, this can be achieved I global.asax, in the Application_Start event handler. In this sample, I have implemented a possible solution in the UI project, by calling the: Chinook.Repository.ContextHelper.Open();


The ContextHelper is implemented as follows:


public static class ContextHelper
{
private static ChinookEntities context ;
private static object objLock = new object();

public static void Open()
{
lock (objLock)
{
if (context != null)
throw new InvalidOperationException("Already opened");
context = new ChinookEntities();
context.Connection.Open();
}
}

}


Calling Open in this singleton class will keep a connection to the SQL Sever Compact file open for the lifetime of the application, and make subsequent  calls to Connection.Open fast.


For deployment, we must move the sdf file the App_Data folder, I have done this in the UI project, and also change the connection string in web.config as follows:


provider connection string=&quot;Data Source=|DataDirectory|\Chinook40.sdf&quot;


Hope you found this walkthrough useful. For a deeper dive into Entity Framework 4, I highly recommend the Julie Lerman book.


You can download the full solution from here: