Tuesday, August 28, 2012

SQL Server Compact Toolbox 3.1–Visual Guide of new features

After more than 130.000 downloads, version 3.1 of my SQL Server Compact Toolbox extension for Visual Studio 2012 and 2010 is now available for download. This blog post is a visual guide to the new features included in this release, many suggested by users of the tool via the CodePlex issue tracker

Export to SQLite

As I have blogged about earlier, the Toolbox now has a feature that enables migration to SQLite, for use for example for migrating Windows Phone solutions to Windows 8 Apps.

clip_image002

Upgrade a SQL Server Compact 3.5 database directly to 4.0

The Toolbox already supports scripting a 3.5 database and running the generated script against a version 4.0 database, but this release contains a feature that does a direct upgrade, using the SqlCeEngine Upgrade method. In addition, the new database will be connected to Server Explorer and the Toolbox automagically.

clip_image003

Option to ignore IDENTITY columns when scripting table data

Some users have requested the option to script table data without SET IDENTITY_INSERT statements, basically ignoring the IDENTITY column. This is now possible via a new user option:

clip_image004

New SQL Server Connection dialog

When connecting to SQL Server to generate scripts, the dialog used in previous version of the Toolbox only worked with Integrated Security, not connections using SQL Server authentication. This is the new dialog:

clip_image005

Other improvements

Improved DataGrid results performance – when enabling showing query results in Grid, performance was not ideal – this has been improved:

clip_image006

Support for VS 2012:

clip_image007

Notice that both 4.0 and 3.5 database file versions are supported by the Toolbox in VS 2012, but that 3.5 SP2 must be installed separately, as it is no longer installed by Visual Studio. Toolbox support for 4.0 in VS 2012 does not require 3.5 SP2 to be installed.

Bug fixes

All SyncFx menu items now only available with SyncFx 2.1 installed
Updated scripting API
Fix of 2 bugs related to "correct" table sorting

Wednesday, August 22, 2012

Getting started with SQLite in Windows Store / WinRT apps

In this blog post I will expand the blog post by Tim Heuer  to include information on how to include and access a pre-populated SQLite database file, maybe even a file created by migrating from a SQL Server Compact database file, as I blogged about recently.

First, download the "SQLite for Windows Runtime" Extension via Tools/Extensions and Updates/Online. Restart Visual Studio.

Then add references to the SQLite and C++ extensions as described by Tim Heuer. Remember to change the Build Configuration to either x64 or x86 in Configuration Manager.

Now add the sqlite-net nuget package to the project, from the References node, select "Manage NuGet Packages" and search online for "sqlite-net":

clip_image002

This will add SQLite.cs and SQLiteAsync.cs to your project.

Now add the SQLite database file to your project as Content:

+clip_image003

If you want the database file to be writeable, you will have to copy it to your local appdata folder. Keep in mind, that when your app is uninstalled, the file will be removed.

You can use code like the following to ensure that the file has been copied:

private string dbName = "chinook.db";
private async void LoadData()
{
await CreateIfNotExists(dbName);
}


private async Task CreateIfNotExists(string dbName)
{
if (await GetIfFileExistsAsync(dbName) == null)
{
StorageFile seedFile = await StorageFile.GetFileFromPathAsync(
Path.Combine(Windows.ApplicationModel.Package.Current.InstalledLocation.Path,
dbName));
await seedFile.CopyAsync(Windows.Storage.ApplicationData.Current.LocalFolder);
}
}

private async Task<StorageFile> GetIfFileExistsAsync(string key)
{
try
{
return await ApplicationData.Current.LocalFolder.GetFileAsync(key);
}
catch (FileNotFoundException) { return default(StorageFile); }
}


And code like this to access data (see the sqlit-net site for more samples) https://github.com/praeclarum/sqlite-net

protected override void OnNavigatedTo(NavigationEventArgs e)
{
var dbPath = Path.Combine(Windows.Storage.ApplicationData.Current.LocalFolder.Path, dbName);
using (var db = new SQLite.SQLiteConnection(dbPath))
{
var list = db.Table<Artist>().OrderBy(a => a.Name).ToList();
}
}


//This would reside in another file or even project
public class Artist
{
[SQLite.PrimaryKey, SQLite.AutoIncrement]
public int ArtistID { get; set; }
public string Name { get; set; }
}

public class Album
{
[SQLite.PrimaryKey, SQLite.AutoIncrement]
public int AlbumID { get; set; }
public string Name { get; set; }
public int ArtistID { get; set; }
}


clip_image004

Hope this will be able to get you started using SQLite with your Windows Store app.

You can download the complete sample with a database file from this link (all code above is in MainPage.xaml.cs): http://sdrv.ms/Pd1xeL

Friday, August 17, 2012

SQL Server Compact 4.0 SP1 Released To Web

SQL Server Compact 4.0 SP1 has now been released as a web download (it is also included and installed with Visual Studio 2012). The release version is 4.0.8876.1

This release adds support for Windows 8 and Visual Studio 2012. In addition, it also includes some bug fixes and a new feature (so far undocumented), as I have described here

I would say it is a recommended upgrade for anyone using version 4.0.

Friday, August 10, 2012

Exporting SQL Server Compact to SQLite

The current available local relational database storage options on WinRT (Windows 8) are limited to SQLite (and maybe some others). Also on Windows Phone 8, both SQL Server Compact and SQLite will be available. So a natural path solutions currently based on SQL Server Compact will be to migrate to SQLite, and the first step would be to move the schema and data to a SQLite database.

I have therefore “bitten the bullet”, and the next version of the SQL Server Compact Toolbox, currently available for download in an alpha version, includes a feature to “dump” a SQL Server Compact database in SQLite .dump format.

image

In this post I will give you some insight in what was required to work with SQLite from the perspective of a SQL Server Compact developer.

The “home”of SQLite is http://www.sqlite.org and all required information is available there.The Downloads page contains a command line utility called sqlite3.exe, which can perform various operations against a SQLite database.The command line utility includes everything required to work with SQLite databases, as the “engine” code is embedded in the .exe – nice.

On of the features included is the ability to “dump” (export) an entire SQLite database to a .sql file, using the following command:

sqlite3 chinook.db .dump > chinook.sql

(Note that the Chinook sample database is also available in SQLIte format)

And the command to create a database file and load a dump file (import) is:

sqlite3 chinook.db < chinook.sql

The dump file has the following format:

PRAGMA foreign_keys=OFF;
BEGIN TRANSACTION;
CREATE TABLE [Shippers] (
  [Shipper ID] INTEGER NOT NULL
, [Company Name] nvarchar(40) NOT NULL
, CONSTRAINT [Shippers_PK] PRIMARY KEY ([Shipper ID])
);
INSERT INTO [Shippers] ([Shipper ID],[Company Name]) VALUES (1,'Speedy Express');
INSERT INTO [Shippers] ([Shipper ID],[Company Name]) VALUES (2,'United Package');
INSERT INTO [Shippers] ([Shipper ID],[Company Name]) VALUES (3,'Federal Shipping');
… More table and data
… Indexes
COMMIT;


The PRAGMA command disables foreign keys constraint checking. And the BEGIN TRANSACTION command makes the process run fast!

So I order to create the SQLite export feature, I decided to create a script in dump file format for SQLite. During the implementation of this, I discovered the following, which you may (or may not) find helpful in your work with SQLite:

1: The dump file must be in UTF8 format, and an UTF8 BOM should not be included. This poses a challenge if you want to edit the file (using Notepad anyway, there are workarounds). I have therefore added the dummy SELECT 1; command to the to of the generated file, to allow you to edit it in notepad.

In order to create a UTF8 file without the 3 byte identifier, use code similar to the following:

            using (FileStream fs = new FileStream(fileLocation, FileMode.Create, FileAccess.Write, FileShare.Read))
{
System.Text.Encoding encoder = new System.Text.UTF8Encoding(false);
if (!sqlite)
encoder = new System.Text.UnicodeEncoding();

using (StreamWriter sw = new StreamWriter(fs, encoder))
{
sw.WriteLine(script);
sw.Flush();
}
}


2: ALTER TABLE is limited, so constraints must be included in the CREATE TABLE statement


3: GO separator is not used, all statements must simply end with semicolon.


4: IDENTITY is implicitly supported, as described here: http://www.sqlite.org/lang_createtable.html#rowid


5: The “N” unicode prefix is not used in SQLite.


6: SQLite datetime data format: '2007-01-01 00:00:00'


7: SQLite binary data format: X’FFAABB’


8: I have decided to not include rowversion columns in the dump file, they do not appear to be supported by SQLite (let me know if I am wrong)

You can view the few code changes I had to make here:
http://exportsqlce.codeplex.com/SourceControl/changeset/93614
http://exportsqlce.codeplex.com/SourceControl/changeset/93619

If you know anything about SQLite, please try the tool/script and let me know what I have done wrong.

The Visual Studio 2010 ADO.NET based tooling for SQLite is available here. Go to the downloads page, and install sqlite-netFx40-setup-bundle-x86-2010-1.0.81.0.exe 


Once you have moved the database to SQLite format you can start using it with for example WinRT, there are a couple of good starter blog posts here:


Tim Heuer: http://timheuer.com/blog/archive/2012/08/07/updated-how-to-using-sqlite-from-windows-store-apps.aspx


Matteo Pagani: http://wp.qmatteoq.com/using-sqlite-in-your-windows-8-metro-style-applications


(Keep in mind that the tooling for this is currently evolving)

Monday, July 30, 2012

The state and (near) future of SQL Server Compact

I recently got asked about the future of SQL Server Compact, and in this blog post I will elaborate a little on this and the present state of SQL Server Compact.

Version 4.0 is the default database in WebMatrix ASP.NET based projects, and version 2 of this product has just been released.

There is full tooling support for version 4.0 in Visual Studio 2012, and the “Local Database” project item is a version 4.0 database (not LocalDB). In addition, Visual Studio 2012, coming in august, will include 4.0 SP1, so 4.0 is being actively maintained currently. Entity Framework version 6.0 is now open source, and includes full support for SQL Server Compact 4.0. (Entity Framework 6.0 will release “out of band” after the release of Visual Studio 2012).

The latest release (build 8088) of version 3.5 SP2 is fully supported for Merge Replication with SQL Server 2012 (note that "LocalDB" cannot act as a Merge Replication subscriber), and Merge Replication with Windows Embedded CE 7.0 is also enabled.

On Windows Phone, version 3.5 is alive and well, and will of course also be included with the upcoming Windows Phone 8 platform. Windows Phone 8 will also include support for SQLite, mainly to make it easier to reuse projects between Windows Phone 8 and Windows 8 Metro.

On WinRT (Windows 8 Metro Style Apps), there is no SQL Server Compact support, and Microsoft is currently (doubt that will change) offering SQLite as an alternative. See Matteo Paganis blog post also: http://wp.qmatteoq.com/using-sqlite-in-your-windows-8-metro-style-applications

So, currently SQL Server Compact is available of the following Microsoft platforms: Windows XP and later, including ASP.NET, Windows Phone, Windows Mobile/Embedded CE.

On the other hand, SQL Server Compact is not supported with: Silverlight (with exceptions), WinRT (Windows 8 Metro Style Apps).

So I think it is fair to conclude that SQL Compact is alive and well. In some scenarios, SQL Server "LocalDB" is a very viable alternative, notice that currently LocalDB requires administrator access to be installed (so no "private deployment"). See my comparison here.

Tuesday, June 19, 2012

HOW TO: Connect to SQL Server Compact from F#

I have previously blogged about connection to SQL Server Compact from other technologies than pure ADO.NET:

ASP Classic

VBA (Excel)

Silverlight

PowerShell

F# version 3.0 in Visual Studio 2012 makes it relatively easy to connect to a SQL Server Compact database (I am NOT a F# programmer, and even I could connect, so it must be very easy!).

In this blog post I will show the required steps to connect to a SQL Server Compact 4.0 database file and start using it via Entity Framework with F#.

In VS 2012 (currently RC), create a new F# application:

image

Now add references to the required libraries (Entity Framework and F# Type Providers):

FSharp.Data.TypeProviders
System.Data.Entity
System.Data.Linq

image

I order to access SQL Server Compact via EF 4 from F#, and Entity Data Model file (.EDMX) file is required. And the EDMX Wizard and Designer only works with C# and VB.NET projects, so to create this, add a Visual C# Console project to the solution:

image

Now add the EDMX file to this project, right click the project, select Add, New Item…, Data,

image

Select generate from database, and point to the desired SQL Server Compact 4.0 database.

Just say no:

image

The Console project now contains an EDMX file, and a useful connection string in app.config.

Now go back to the F# project clear program.fs, and add the following “using” statements:

open System
open System.Data.Linq
open System.Data.EntityClient
open Microsoft.FSharp.Data.TypeProviders


Grab the connectionString value from the console project app config, and add this line:

let internal connectionString = "metadata=res://*/;provider=System.Data.SqlServerCe.4.0;provider connection string='data source=C:\\Data\\SQLCE\\Test\\nw40.sdf';"


Notice the changes to the provider connection string - =&quot; has been change to single quote, and backslashes have been escaped.


Now add the EDMX file from the Console project to the F# project as Content:


image


You can now initialize the EF type provider like so:

type internal edmx = EdmxFile<"NWModel.edmx">


And start using the context like this:

let internal context = new edmx.nw40Model.nw40Entities(connectionString)

let internal res = query { for supplier in context.Suppliers do select supplier }

res|> Seq.iter (fun supplier -> printfn "%s" supplier.Company_Name)

let wait = Console.ReadKey()

Friday, May 25, 2012

Private deployment of SQL Server Compact 3.5 SP2

The information found in the official documentation is not very extensive, and this blog post hopes to extend on the information found there. I have already blogged about private deployment with SQL Server Compact 4.0, and have an overview post here. 

SQL Server Compact 3.5 SP2 requires the following software:

The OS must be Windows XP SP3 or higher:

For applications targeting .NET 3.5 SP1, no additional software is required.

For applications targeting .NET 4.0, either .NET Framework 3.5 SP1 or the VC++ 2005 SP1 redistributable (for x86 and/or x64) is required.

Make sure the 3.5 SP2 runtime is properly installed, on x64 machines you must install both the x86 and x64 runtimes.

Let us assume that the requirements above are fulfilled (notice that Windows 7 includes .NET 3.5 SP1). So what else is required – let’s make a Console app and find out! Our goal is to create an application, that runs without SQL Server Compact 3.5 SP2 already installed, on both x64 and x86 systems. Notice that the instructions below works, no matter if your application targets “x86” (the 32 bit .NET Framework on all platforms, “Any CPU” (either the 32 or 64 bit .NET Framework), or x64 (the 64 bit Framework exclusively).

In Visual Studio, create a new Console project:
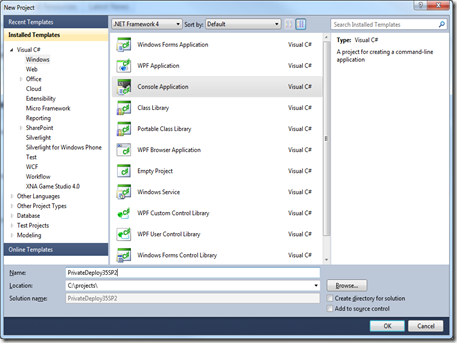
image

Now we must include the unmanaged SQL Server Compact C++ runtime files, each set of files in their own folder, which are platform specific. So create 2 folders in the project, one named x86 for the 32 bit files, and one named AMD64 (not x64!) for the 64 bit files.
NOTE: This convention, based on the value of the PROCESSOR_ARCHITECTURE environment variable is a special SQL Server Compact feature.

image 

Now we must locate the required files. If you are using a 32 bit machine, only the 32 bit files are installed on your machine, and you must manually extract the 64 bit files to a folder as described here. I am using (like most these days) a x64 machine, and it has the  most recent files for both platforms already installed. Make sure that all files you include have the exact same file version, or you will fail. The 3.5 SP2 file version is 3.5.8080.0, you can view the file version in Windows Explorer.

The files in the “C:\Program Files” folder are all 64 bit files, and the files in the “C:\Program Files (x86)” folder are all 32 bit files (on x64 systems)

The files you need to add are:
sqlceca35.dll
sqlcecompact35.dll
sqlceer35EN.dll
sqlceme35.dll
sqlceoledb35.dll
sqlceqp35.dll
sqlcese35.dll

So, add the files from C:\Program Files\Microsoft SQL Server Compact Edition\v3.5 to the AMD64 project folder, using Add, Existing Item (make sure to change the filter to “All files”):
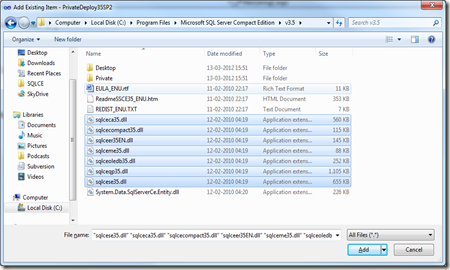
image

Make sure all files are included with Build Action = Content, and Copy to Output Directory = Copy Always:
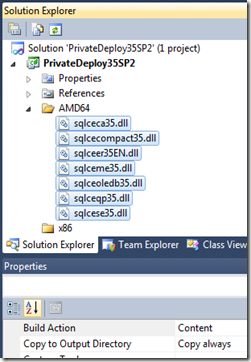
image

Then add files from C:\Program Files (x86)\Microsoft SQL Server Compact Edition\v3.5 to the x86 project folder, in the same way:
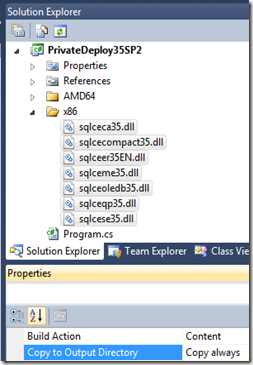
image

Finally, add the ADO.NET provider (System.Data.SqlServerCe.dll) to the project root, add this file form the C:\Program Files\Microsoft SQL Server Compact Edition\v3.5\Private (!) folder. Also set this file as Content, Copy Always:
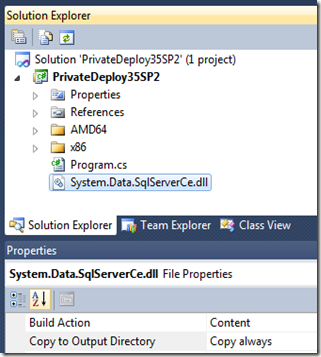
image

Now add a reference to the ADO.NET provider in the root project folder:
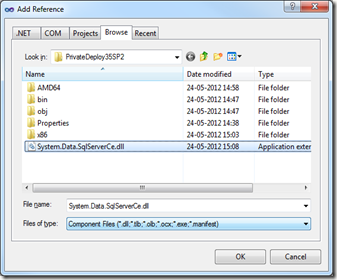
image

Make sure the Version (Assembly Version) is 3.5.1.50, that indicates that it is the correct file:
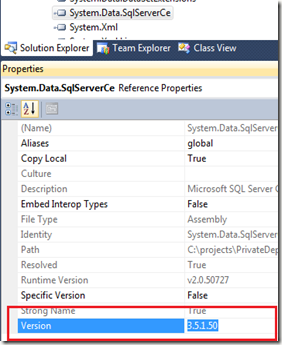
image

Now build the project, and look in the bin/debug folder, to make sure all files are copied with the project output. You can now test that private deployment works either by uninstalling the 3.5 SP2 runtimes or on a PC without the runtimes installed.

If you are using only ADO.NET “Classic” (no LINQ to SQL or Entity Framework), this is all you need for private deployment. If you initialize a LINQ to SQL DataContext with a SqlCeConnection object, as I describe here, no additional configuration is required.

If you depend on the DbProvider API (LINQ to SQL and Entity Framework does), you must add the following to your project’s app.config:

<?xml version="1.0" encoding="utf-8"?>
<configuration>
<system.data>
<DbProviderFactories>
<remove invariant="System.Data.SqlServerCe.3.5" />
<add
name="Microsoft SQL Server Compact Data Provider 3.5"
invariant="System.Data.SqlServerCe.3.5"
description=".NET Framework Data Provider for Microsoft SQL Server Compact"
type="System.Data.SqlServerCe.SqlCeProviderFactory, System.Data.SqlServerCe, Version=3.5.1.50, Culture=neutral, PublicKeyToken=89845dcd8080cc91"
/>
</DbProviderFactories>
</system.data>
</configuration>

UPDATE Feb 2013: Entity Framework private deployment is ONLY supported with Entity Framework 1.0, so below will not work in VS 2010/VS 2012 (EF 4.0 and EF 5.0)


If you use Entity Framework, you must add the C:\Program Files\Microsoft SQL Server Compact Edition\v3.5\Private\System.Data.SqlServerCe.Entity.dll to your project root as content, and have a configuration like the following (as described by the SQL Compact Team here)

<?xml version="1.0" encoding="utf-8"?>
<configuration>
<system.data>
<DbProviderFactories>
<remove invariant="System.Data.SqlServerCe.3.5" />
<add name="Microsoft SQL Server Compact Data Provider 3.5" invariant="System.Data.SqlServerCe.3.5" description=".NET Framework Data Provider for Microsoft SQL Server Compact" type="System.Data.SqlServerCe.SqlCeProviderFactory, System.Data.SqlServerCe, Version=3.5.1.50, Culture=neutral, PublicKeyToken=89845dcd8080cc91" />
</DbProviderFactories>
</system.data>
<runtime>
<assemblyBinding xmlns="urn:schemas-microsoft-com:asm.v1">
<dependentAssembly xmlns="">
<assemblyIdentity name="System.Data.SqlServerCe" publicKeyToken="89845dcd8080cc91" culture="neutral" />
<bindingRedirect oldVersion="3.5.1.0-3.5.1.50" newVersion="3.5.1.50" />
</dependentAssembly>
</assemblyBinding>
</runtime>
</configuration>


Hope this was useful!