Wednesday, November 24, 2010

SQL Server Compact “Private Deployment” on desktop–an overview

Scenario: You want to deploy a SQL Compact / .NET based application, using private deployment only. Your application depend on a certain .NET Framework version. The table below illustrates your options, as you can see there are special considerations, if your clients only have .NET 4.0 and not .NET 3.5 SP1 installed.

Installing the SQL Server Compact MSI also installs the required Visual C++ runtime files.

Also, notice that all files required for private deployment are included in the private folder in either Program Files or Program Files (x86) (C:\Program Files\Microsoft SQL Server Compact Edition\v4.0\Private) for version 4.0.

For information on private deployment, see SQL Server Compact 3.5 SP2 Books Online and this blog post and this reply. Notice that 3.5 SP2 Books Online is only available “offline”.

UPDATE: Also see this blog post: http://erikej.blogspot.com/2011/02/using-sql-server-compact-40-with.html with a sample MSI project for a WPF app.

UPDATE 2: Also see this blog post for some advanced scenarios: SQL Server Compact Private Deployment tweaks

UPDATE 3: Private deployment of 3.5 SP2 article published

SQL Server Compact 3.5 SP2

SQL Server Compact 3.5 SP2 requires .NET 2.0 or later.

Application

Windows platform
SSCE 3.5 SP2
with .NET 2.0
SSCE 3.5 SP2
with .NET 3.5 SP1
SSCE 3.5 SP2
with .NET 4.0
XP (no .NET included)

NO

NO

NO

XP (.NET 2.0)

YES

NO

NO

XP (.NET 3.5 SP1)

YES

YES

NO

XP (.NET 4.0 only)

NO

NO

NO (1)

XP (.NET 3.5 SP1 and
.NET 4.0)

YES

YES

YES

Vista (.NET 2.0/3.0 included)

YES

NO

NO

Vista (.NET 3.5 SP1)

YES

YES

NO

Vista (.NET 3.0 and
.NET 4.0)

YES

NO

NO (1)

Vista (.NET 3.5 SP1 and
.NET 4.0)

YES

YES

YES

7 (.NET 3.5 SP1 included)

YES

YES

NO

7 (.NET 3.5 SP1 and
.NET 4.0)

YES

YES

YES


1: Microsoft Visual C++ 2005 SP1 Redistributable Package (x86)  and/or Microsoft Visual C++ 2005 SP1 Redistributable Package (x64) must be installed.

SQL Server Compact 4.0 RTW

SQL Server Compact 4.0 RTW requires .NET 3.5 SP1 or .NET 4.0

Application

Windows platform
SSCE 4.0
with .NET 3.5 SP1
SSCE 4.0 RTW
with .NET 4.0
XP (no .NET included)

NO

NO

XP (.NET 3.5 SP1)

YES

NO

XP (.NET 4.0 only)

NO

YES

XP (.NET 3.5 SP1 and
.NET 4.0)

YES

YES

Vista (.NET 2.0/3.0 included)

NO

NO

Vista (.NET 3.5 SP1)

YES

NO

Vista (.NET 3.0 and
.NET 4.0)

NO

YES

Vista (.NET 3.5 SP1 and
.NET 4.0)

YES

YES

7 (.NET 3.5 SP1 included)

YES

NO

7 (.NET 3.5 SP1 and
.NET 4.0)

YES

YES


Tuesday, November 16, 2010

Using Entity Framework with SQL Server Compact 4.0 CTP and ASP.NET – tips & tricks (part one)

As you may know by now, the major new feature of SQL Server Compact 4.0 is support for ASP.NET starter websites. In addition, the Entity Framework support has been improved with the following features:

- Support for Code First development (requires EF 4 Feature CTP 4), allowing you to create database and schema in code.

. Support for paging (can be implemented with Skip and Take in LINQ).

- Support for server generated keys (IDENTITY)

The purpose of this post is to show how to use Entity Framework 4 with SQL Server Compact 4.0 and ASP.NET without having the full support for SQL Server Compact 4.0 in VS 2010.

I will cover the following scenarios in the sample application:

1: Migrate data and schema for the solution from either SQL Server Compact 3.5 or SQL Server 2005 or later.

2: Create a Type-Per-Table Entity Data Model (EDM) based on a SQL Server Compact 4.0 database.

3: Create a layered application, where the UI has no knowledge of Entity Framework, in order to improve testability, minimize UI code and allow the Data Access layer to be replaced with another Data Access Technology (unlikely, I know Smile)

4: Provide the initial implementation of a music track list displayed in a grid, which can be sorted and paged.

5: Provide access to invoice data in Excel

6: Allow easy management of lookup tables like Genre, Artist and MediaType

7: Use various extension methods, that make your life with Entity Framework smoother.

For this sample I am using the Chinook database from CodePlex, which is delivered in script format and as a 3.5 SDF file. The Chinook database schema represents a digital media store, including tables for artists, albums, media tracks (3500 tracks), invoices and customers.

Creating the database (optionally migrating from 3.5 or Server)

Depending on your starting point, there are many ways to get to a 4.0 database.

If you have a 3.5 database, you can use SqlCeCmd40.exe to upgrade a copy of this database to 4.0:

sqlcecmd40 –d”Data Source=C:\data\Chinook40.sdf” –e upgrade

will do an in-place upgrade for you. (This requires 4.0 CTP2)

If you have a database script, either from a SQL Server database (created by Export2SqlCe.exe or from elsewhere), you can use SqlCeCmd40.exe to create an empty 4.0 database file and import the script:

sqlcecmd40 –d”Data Source=C:\data\Chinook40.sdf” –e create

sqlcecmd40 –d”Data Source=C:\data\Chinook40.sdf” –i C:\x.sql

Or you can use WebMatrix to graphically create the database. (Support for doing this in Visual Studio will come with VS 2010 SP1).

Creating the Data Access Layer

As mentioned, I will create a database first EDM. Due to the missing Server Explorer / Data Sources integration with SQL Compact 4, you will have to do this by using a workaround. I know of 2:

Either by using the command line tools as described in the blog: http://getsrirams.blogspot.com/2010/10/adonet-entity-data-model-for-sqlserver.html or

Have a 3.5 database handy with the exact same table definition (schema) as the 4.0 database. After generating the EDM based on the 3.5 database, tweak the model to work with a 4.0 database. Let’s see how this is done:

Start by creating an empty solution, named Chinook, to hold our projects:
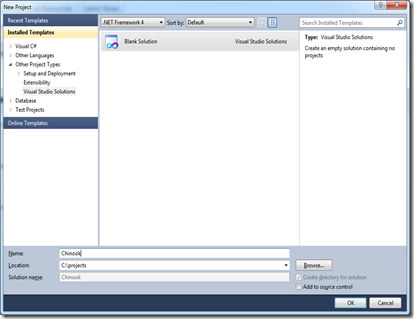
image

Then add a C# Class library project to the solution, and name it Chinook.Data:

image

Remove Class1.cs, then go to file system, and copy the Chinook.sdf (the 3.5 version) to the solution folder (C:\projects\chinook).

image

(I have also copied the 4.0 version, so I can easily find it later). Now we can add the EDM based on the 3.5 database file:

image

Name the model ChinookModel.edmx and click Add. In the next step, select Generate From Database, and click Next.

On the “Choose you data connection” step, create a new connection to the Chinook.sdf 3.5 version database, using the SQL Server Compact 3.5 provider, and click Next:

image

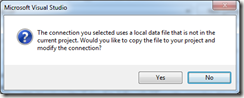
Then you get this question:

image

(I suggest you reply No)

image

Select all tables, select pluralize and click Finish. Now we have our Model:

image

Now, let’s make the Model work with our SQL Server Compact 4.0 file. First, modify the connection string in app.config as follows:

image

Then modify the emdx file (right click the file, and select Open With.. XML Editor).

image

Verify your changes by opening the edmx file in the visual designer.

Creating the POCO Entities for use with Repository

Now let us create a separate class library for our POCO entities based on the model, This will allow us to reference this Model project from both the data access layer and the UI layer. In order to do this, follow the steps in this EF Team blog post, and you will end up with a solution structure like this:
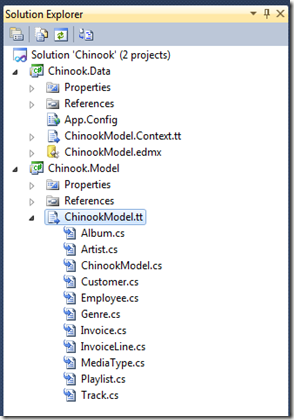
image

Notice the following change,that was made to ChinookModel.tt in order to have the entities in a separate project:

string inputFile = @"..\Chinook.Data\ChinookModel.edmx";

Also, a reference to the Chinook.Model project was added to Chinook.Data:

image

And the Custom Tool Namespace for the Chinook.Model.Context.tt file was set to Chinook.Model:

image

Creating the Repository

Now, add a Chinook.Repository project to the solution, to create the data access methods used by the UI. This project should reference the Chinook.Model and the Chinook.Data projects. As always, remove the Class1.cs file. Now, we want to create a method that allows the UI to get a page of Track data for display in a GridView. This is an initial implementation (notice the parameters, which are passed by default when using and ObjectDataSource from the UI):

public List<Track> GetAll(string sortBy, int maximumRows, int startRowIndex)
{
using (var context = new ChinookEntities())
{
return context.Tracks.Include("Albums").Include("Artists").Include("Genres").ToList();

}
}


There are some things missing/not ideal with this:

- The Include statements are based on text strings.


- Sorting and paging is not implemented


In order to make the Include statement strongly typed, I have located an extension method from http://blogs.microsoft.co.il/blogs/shimmy/archive/2010/08/06/say-goodbye-to-the-hard-coded-objectquery-t-include-calls.aspx (Implemented in the ObjectQueryExtensions.cs file in the Chinook.Data project)


public List<Track> GetAll(string sortBy, int maximumRows, int startRowIndex)
{
using (var context = new ChinookEntities())
{
return context.Tracks.Include(t => t.Album.Artist).Include(t => t.Genre).ToList();
}
}


That’s much better, and avoids nasty runtime errors.


The sortBy parameter from the ObjectDataSource is just a text string (field name), optionally followed by “DESC”. So to do sorting, we could write a long case statement to set the sortexpression, or use another extension method, which accepts a sort expression. I found one here: http://landman-code.blogspot.com/2008/11/linq-to-entities-string-based-dynamic.html


public List<Track> GetAll(string sortBy, int maximumRows, int startRowIndex)
{
using (var context = new ChinookEntities())
{
if (string.IsNullOrWhiteSpace(sortBy))
{
sortBy = "Name";
}
return context.Tracks.Include(t => t.Album.Artist).Include(t => t.Genre).OrderUsingSortExpression(sortBy).Skip(startRowIndex).Take(maximumRows).ToList();
}
}


In addition to the GetAll method, in order to support paging, the repository must also implement a GetCount method: 


public int GetCount()
{
using (var context = new ChinookEntities())
{
return context.Tracks.Count();
}
}


Creating the UI Layer


Now, add a ASP.NET Web Application project. Call it Chinook.UI. Add a “WebForm using Master”, and call it TrackList.aspx. Add references to Chinook.Model and Chinook.Repository.


Add this content to TrackList.aspx:


image


Notice the highlighted sections in the markup.


Add the connection string entry from the Data project to web.config.


Set the UI project as Start Project and the TrackList.aspx as start page.


Press F5 and see it run!


To display the Album title rather than the albumId, add a AlbumName readonly property to a new Track.Custom.cs POCO partial class, and display the Album.Name when requested:


//For display only
public string AlbumName
{
get
{
if (this.Album != null)
{
return this.Album.Title;
}
else
{
return string.Empty;
}
}
}


Then change the asp:boundfield from AlbumId to AlbumName in the TrackList.aspx file (you can do the same for other foreign key fields)


<asp:BoundField DataField="AlbumName" HeaderText="Album" 
SortExpression="" />


Download the project so far from here.


In part 2, we will continue with the following additional features:


- Adding a Dynamic Data Project to quickly manage the lookup tables


- Creating an OData layer, allowing access from PowerPivot in Excel


- Deployment advice


(Thanks to Morten Hedekær Olsson for technical review)

Sunday, November 7, 2010

Meet me at TechEd Europe in Berlin next week

I am attending TechEd from 8-12 November, and looking forward to learning new things about SQL Server Compact, Sync Framework, Entity Framework, OData, WebMatrix, Visual Studio SP1 etc. (all technologies that are related to SQL Server Compact).

I will be present in the Technical Learning Centre, SQL Server Data Technologies & Developer Tools booth during the event, so feel free to come and have a chat about some of the technologies and tools, that the SQL Server Data Programmability team provides.

See you in Berlin!

Friday, November 5, 2010

SQL Server Compact 4.0 CTP2 released

Together with WebMatrix beta 2, SQL Server Compact CTP2 has been released. The build number for this release is: 4.0.8435.1.

(CTP1 build number was: 4.0.8402.1)

Direct download link is:

x64 runtime: http://go.microsoft.com/fwlink/?LinkID=202429 (includes x86 runtime for x64 systems)

x86 runtime: http://go.microsoft.com/fwlink/?LinkID=202428

There is no updated documentation with this release, but a couple of bugs reported by me have been fixed:

Inability to upgrade in-place - http://social.msdn.microsoft.com/Forums/en-IE/sqlce/thread/872e49da-1d3e-457a-9288-c1e1f0c90dc8

Get SqlCeReplication.SubscriberConnectionsString returns an invalid connections string - http://connect.microsoft.com/SQLServer/feedback/details/589806/sql-server-compact-4-replication-library-bug-w-subscriberconenctionstring

Update: CTP2 causes some issues with EF Feature CTP4 (and MVC 3 beta), if you are using |DataDirectory| macro in your connection string:
http://social.msdn.microsoft.com/Forums/en/adonetefx/thread/808df2cc-1177-47d9-b333-304701520cc8

Saturday, October 30, 2010

New release of ExportSqlCe SSMS add-in and command line utilities–Script to SQL Azure

The new release (version 3.5) of my scripting utilities for SQL Server Compact includes a couple of bug fixes and a single new feature: Script Schema and Data for SQL Azure.

image

This new feature allows you to migrate your SQL Server Compact solution to a SQL Azure database. The SQL Azure compatible script includes the following changes compared to the standard, SQL Server Compact and SQL Server compatible script:

- Primary keys are scripted before any INSERTs, as a clustered index is required on all SQL Azure tables.

- INSERTs are batched (1000 per GO), to improve performance when running the script against a SQL Azure database.

- ROWGUIDCOL property is not supported, so it is not included.

The SQL Azure script is also SQL Server Compatible, but not SQL Server Compact compatible.The matrix below illustrates your options:

Script option SQL Server and SQL Server Compact SQL Azure and SQL Server
Schema and Data

X

N/A

Schema and Data for SQL Azure

N/A

X

Schema and Data with BLOB files

X (Compact)
(requires SqlCeCmd)

N/A

Schema only

X

(X)

Happy scripting!

Wednesday, October 27, 2010

SQL Compact 4.0 now available as a .zip file

With the recent release of NuPack beta, SQL Server Compact 4.0 CTP is now available as a .zip file. a feature requested by many users: since SQL Server Compact is just a collection of DLL files, why do you need to install an MSI to get hold of these DLL files.

NuPack has the purpose of simplifying the process of incorporating third party libraries into a .NET application during development. An introduction to NuPack is available here.

You can download the NuPack add-in here.

Once you have downloaded the add-in, you can add the SQLCE package from the References context menu in Solution Explorer, using the new “Add Package Reference” dialog:

 image

image

Let’s have a closer look at the contents of the SQLCE NuPackage and the changes it makes to your project.

As you can see with “Show All Files” enabled, the installation has added a packages folder to the file system:

image

Let’s Open Folder in Windows Explorer and have a closer look:

image

The packages\SQLCE.4.0.8402.1 folder contains the .zip file that constitutes the SQLCE package, and folders with content from this .zip file:

Content contains a file with changes to your projects web.config or app.config file, which enables the SQLCE 4.0 DbProviderFactory, the lib folder contains the .NET DLL to be installed and referenced, the NativeBinaries folder contains two folders for the platform specific parts of the SQL Server Compact 4.0 engine. and finally, the tools folder contains scripts to add a post build job to your project, that copies the files in the NativeBinaries folder to the bin folder.

(This custom PowerShell solution for copying the native DLL files may be changed to a more general solution in the future: http://nupack.codeplex.com/workitem/109 )

So in summary, NuPack helps with many of the manual process involved in privately deploying SQL Server Compact 4.0.

Sunday, October 17, 2010

HOW TO: Detect SQL Server Compact version information

There are various aspects to getting the version information for SQL Server Compact. This blog post is an attempt to cover them all, let me know if something is missing.

Assembly Version

The System.Data.SqlServerCe.dll ADO.NET Provider version. (AssemblyVersion)

This is not part of the file information, but .NET specific, part of the assembly’s identity.

var version = typeof(System.Data.SqlServerCe.SqlCeConnection).Assembly.GetName().Version;

This will give you the assembly version of the System.Data.SqlServerCe.dll, not the build number.

For 3.1, this is 9.0.242.0 for the desktop and 3.0.3600.0 for devices (not exactly what you would expect)

For 3.5 RTM, this is 3.5.0.0

For 3.5 SP1 and SP2 this is 3.5.1.0

“ServerVersion”

The ServerVersion property of the SqlCeConnection object.

var ver = new System.Data.SqlServerCe.SqlCeConnection().ServerVersion;

For 3.5/4.0 this will give you the build version of the database engine, including any patches. For 3.5 SP2 this is "3.5.8080.0"

(Sadly for 3.1, this returns “9.0.242.0”)

File version of the managed DLLs

Getting the file system version of the managed ADO.NET provider will give you more precise version information (in particular for 3.0/3.1), and will not require guessing the location of any DLL files (as below for getting the version for unmanaged files).

string fullPath = System.Reflection.Assembly.GetAssembly(typeof(System.Data.SqlServerCe.SqlCeConnection)).Location;
var asmInfo = System.Diagnostics.FileVersionInfo.GetVersionInfo(fullPath);
string asmFileVersion = asmInfo.FileVersion;

For 3.1, this returns 3.0.5300.0 (for patches the final zero will be from 1 to 14)

File version of the unmanaged DLLs

As you may know, the SQL Server Compact engine consists both of managed DLL files (the System.Data.SqlServerCe.dll that has been referenced in all code above), and a number of C++ unmanaged DLL files.

Getting information about these files is more challenging, as we need to locate the unmanaged DLL files. This can be done like so for 3.5 and 4.0 (if installed by an administrator on the machine):

Microsoft.Win32.RegistryKey registryKey = Microsoft.Win32.Registry.LocalMachine.OpenSubKey(@"SOFTWARE\Microsoft\Microsoft SQL Server Compact Edition\v3.5", false);
string pathName = (string)registryKey.GetValue("InstallDir");
var info = System.Diagnostics.FileVersionInfo.GetVersionInfo(System.IO.Path.Combine(pathName, "sqlceme35.dll"));
string fileVersion = info.FileVersion;

File format/version of database file

The sample in this blog entry gives you the file version, there are only difference in this per major version (2.0, 3.1/3.0, 3.5 and 4.0)

http://erikej.blogspot.com/2010/08/how-to-upgrade-version-3x-database-file.html

Product version information

Information from the product team about product release versions is available here: SQL Server Compact Release Versions and here: Description of the various build versions of SQL Server Compact Edition

In addition, I have lists of available hotfixes on this blog for version 3.5 SP1 and 3.5 SP2